Tip o’ the Week 356 – How not to send mail accidentally

clip_image001An ohnosecond is the small measure of time between a luser doing something seemingly innocuous, then realising the true magnitude of what you’ve done.

Frobbing a scram switch without knowing. The dawning reality that a protest vote might actually result in that thing actually happening. Sending an email to someone you didn’t mean to, that kind of thing.

Fortunately, most of us have a limited ability to truly mess things up (leaving aside Darwin Awards candidates), but something that most of us will have done at some point, is that unintended sending of mail. The situation could come up for a number of reasons:

  • Someone is copied on the mail that you’re replying to, and you either don’t realise or you intended to remove them from the list but forgot. Maybe you went on to theorise about their capability or speculate on their intent. Normally just embarrassing, could be career-limiting.
  • clip_image003You accidentally add someone to the TO: or CC: line of a mail, intending to remove them, but don’t. This is basic carelessness which can be avoided by not adding people to the TO: or CC: lines of your email unless you genuinely intend to send the mail to them… [coming to a Bedlam expansion pack sometime]
  • You Reply-All by default to emails, maybe asking to be removed from the mailing list. Don’t do that. Seriously.
  • You send an email then just after, realise that a later message has changed the conversation and that, if you’d read that first, you either wouldn’t have replied, or if you did, you’d say something different.

There are a couple of easy things anyone can do to avoid these issues, apart from thinking before sending and maybe re-reading all of what you’ve written before sending it to what you know to be a large group, or with important people on the list.

clip_image005

  • DON’T put people on the TO: or CC: line as a way of looking them up in the address book; it’s an easy trap to fall into; maybe you just want to check how someone’s name is spelled, or find out who their boss is, etc. If you want to do that, go to the main Outlook window (ie not the email editor, if you happen to have that as a separate window), and just press CTRL+SHIFT+B to bring the address book to the fore. Or, click the Address Book button on the Home tab, or just type the name into the box above it.
  • Try delaying the sending of new messages – in principle, keeping outbound mail in the special “Outbox” folder on your PC until some period of time before actually pushing the message out to the recipients.
    • clip_image007One option might be to delay specific messages, probably more for impact – if you want people to receive mail at a particular time (following an announcement that you know is going to happen at a set time, for example), then you can force that message to sit for a while – an extended time, maybe – before being put into the sending queue. See the Delay Delivery icon on the Options tab within the message window.
      clip_image009
      One downside to putting stuff in the Outbox is that when you’re running Outlook in the default “Cached” mode, then the Outbox is a special folder on your PC – so if something is sitting there waiting to be sent, and you put the PC to sleep or it goes offline, then the message will stay there until the next opportunity presents itself when your PC wakes up and is online.
      There is a slightly more convoluted way of putting delayed mail in the Outbox on the server – see veteran ToW #30.
    • clip_image011To delay every message for just a few minutes, to give you an opportunity to yank them from the Outbox, then create a rule…
      • On the Home tab in main Outlook window, try creating a new rule by going to Manage Rules & Alerts then, and clip_image013
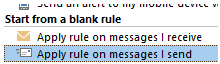
choosing New Rule, then under “Start from a blank rule” choose “Apply rule on messages I send”
      • On the new rule dialog, select “Next” to apply the rule to every message sent (on the “Which condition(s) do you want to check” tab), then on the “what do you want to do with this message” page, select the “Defer delivery” option and choose the number of minutes, then hit Finish / OK to apply the rule and return.

Now, when you send a message, it has the property set that delays it for however many minutes you wanted to wait – if you need to send it quickly (so you can disconnect or shut down, for example) you can go into the Outbox folder, open the message, change the “Delay Delivery” option on that individual message and press Send again.

Tip o’ the Week #282 – Delay your mail

There are several techniques to delay sending messages, something that could be considered good practice – according to Harvard Business Review, for example, bosses who send email late in the night are causing lots of stress as people feel obliged to respond immediately. A counter-argument would be that if people don’t want to respond to emails late at night, one tactic might be to not be reading them late at night in the first instance.

There may be good reasons to be emailing late on, although sometimes the sender might appreciate a delay or a sanity check – like the Google Mail Goggles idea unveiled some years ago, that would check that the sender isn’t steaming drunk when sending mail late at night. Expect the Google Beer Scooter to be along any time soon.

Sometimes, it’s easy to spot that your boss is travelling – if you suddenly get an email dump, then maybe s/he has been offline in the air or on a train, and has used the time to catch up on stuff which only gets sent when they arrive and connect. This is, of course, a good use of time that would otherwise be spent looking out of the window, watching movies on the seat-back screen and/or getting tanked up on inflight vino.

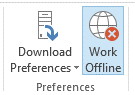
Back on terra firma, if you do need to write emails that may not need to be sent or read over a weekend or during the night, you could try Offline mode: simply go into the Send/Receive tab of the main Outlook window, and click the icon in Preferences.

Outlook being in Offline mode lets you review the emails you’ve got sitting in the Outbox, before committing to sending them, which could be handy especially if you’re bulk-sending. Alternatively, when in online mode, you, you can delay individual emails’ sending time by looking in the Options | Delay Delivery section of the actual message window.

Delay everything

Another safety valve that some people rely on is to slightly delay everything they send – a technique that lets you fish out messages from the Outbox folder in case of accidentally sending them to the wrong person, hitting send too soon, etc.

The trick is to create a rule in your mailbox (NB – if you want to follow these instructions, you may want to arrange your windows so that you can see this on a 2nd monitor, or arrange the main Outlook window and this message side-by-side, as when you start digging around in Outlook rules, you won’t be able to flick back to this message if it’s behind the Outlook window).

  • In the main Outlook application window, go to Manage Rules & Alerts and click on New Rule
  • Select Apply rule on messages I send and then determine if you want to apply some other conditions – maybe you only want to delay emails being sent to certain groups of people or if they contain certain words; if you don’t want to restrict to a given set of conditions, just leave everything blank and hit Next – and accept the fire-and-brimstone warning 
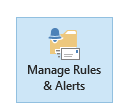
message that this rule will apply to every message…
  • Next, set the timing you want to apply to the rule and hit OK – and when you go to save/apply the rules, you’ll get a warning that this rule will only run on this PC, which is as expected, since it’s a client-side one.
  • Now, be careful – outgoing messages will sit in the Outbox folder on the PC you’re using, but that’s a special folder that exists only on your current machine and isn’t synchronised with the server or anything else – so if you hit send and then immediately close the lid on your laptop, your PC might go to sleep and the email will stay in Outbox until it resumes again…
  • If you get cold feet on sending, or decide you need to edit your missive, just go into the Outbox folder, and if the email shows with the recipient name or address in italics, then it means it’s waiting to be sent – if you open up the mail and then just save it again, it’ll stay in the Outbox but won’t be sent until you edit it again and press the Send button again.

Finally, it’s possible to send mail in the future/from the past when you’re offline entirely. That’s a whole other topic that’s been covered 4 years ago.

Tip o’ the Week #274 – Hello, Skype for Business

clip_image001

Instant Messaging (and later, voice/video calling) has been with us, in the corporate world, for 15 years – the first real enterprise IM platform was Exchange 2000 Instant Messaging, which used a variant of MSN Messenger as its client, and some workers had been using MSN and AOL for a while before that.

The Exchange 2000 IM server was a one-off; it was superseded by Microsoft Office Live Communication Server (released at a time when everything at Microsoft was seemingly prefixed or suffixed “Live”, and somehow linked to Windows or Office) and latterly Office Communications Server (when the edict came around to ditch the practice of sticking “Live” in every product name), and later acquired the much groovier name of “Lync”.

And now the next phase has rolled out; just as the original MSN Messenger gave way to Windows Live Messenger (see?) and then went away in favour of Skype, Lync has now given over to Skype for Business – though SFB is effectively a technology update, rebranding & a new UI, rather than the wholesale change of underlying technology that MSN/Live Messenger to Skype was.

So now we have Skype for Desktop (the traditional Windows, Mac etc application, which uses a Skype ID or Microsoft Account to sign in), there’s Skype for a variety of mobile & TV platforms, Skype for Outlook.com (the plugin to Outlook.com online email, you know, the email service that was once Hotmail). And for Windows 8.x users, there’s also Skype the Modern Application, now also being referred to as Skype for Tablet.

D’ya follow?

And now the spangly new Skype For Business client has been distributed via Windows Update, as an update to Lync – so you may already have received it. If you haven’t, and you’re still on Lync, you could either:

  • clip_image003Try downloading the update to turn Lync into Skype, from KB2889923
  • If you’re running Office in “Click to Run Mode”, you can check for updates by going into (for example) Word and choosing File / Account, then select Update Options / Update Now. See here for more.

Or maybe you’ll get it automatically via a corporate deployment. It may even have been pushed out to you already,

Whatever, you’ll have a cracking new updated UI compared to Lync, and the emoticons will be better again… in fact, most of the animated icons from the regular consumer Skype app have made it over to the corporate one, with a few of the less work-oriented ones removed. clip_image001

Tip o’ the Week #264 – BCC people to a meeting

clip_image002There’s a great deal of etiquette bound up in email communications – and it varies by culture and sometimes by country. Some people politely make the point of always addressing the recipient in an email, and in thanking them at the end, whereas others apparently look on it as a badge of honour to contain everything in a single terse line with no capitalization. Especially when it comes to OOF messages.

One of the cardinal sins of email management is in misusing the BCC function – you know, the ability to copy someone on an email without showing their name to everyone else. BCC can be very handy at letting one user or group know what is being said to another, without exposing the former’s email addresses or in fact making it explicit that they’re aware of what’s going on. Maybe duplicitous but clip_image004handy at times.

Whatever you do, do not BCC large distribution lists. Some people think they’re doing a group a favour by replying-all to some thread and BCC’ing the group so it doesn’t get sent any of the subsequent replies… but what that often will do is circumvent any rules that members of that group have set up to fire all emails sent to it, into a folder. Now, post-BCC, everyone will probably receive your email in their Inbox, all the while wondering why.

What About meeting requests?

clip_image006BCC is very handy when you’re emailing a group of people – maybe sending an external mail to a bunch of customers and you don’t want to inadvertently share everyone’s address with each other.

Funnily enough, one scenario where BCC would be most useful is when you want to invite lots of people to a meeting – an event, a party, etc  – and there are plenty reasons why it might be best that they don’t know who else is being invited. Yet, there is no BCC option on meeting requests… it’s just not there.

clip_image008But feat not, intrepid readers – it is possible to effectively BCC people on a meeting request, by inviting them as Resources. There are basically 2 ways that most of us will add names to a meeting request – either create it as a meeting in the first place, or create an appointment, then…

· …either type their names into the shown-by-default “To” box, or choose Scheduling Assistant to add people by just entering their names in the list, to invite them.

· … or add names to your request by clicking on Invite Attendees (which actually turns an appointment into a meeting, as meetings are appointments where other people are invited – ya falla’?), then click on the To button (or Add Attendees button).
clip_image010 This brings up a dialog box that will expect you to select people from the address list, and select them as Required or Optional attendees (does anyone ever use Optional?). Or, in fact, Resources – the thinking being that the address book could have entries for resources like meeting rooms or even bookable equipment, that you could invite to your meeting thereby claiming it for your exclusive use.

Now, if you’d like to invite people to a meeting and have the request be sent out to them but not show their address to anyone else, just stick them in as Resources – either by selecting them from the address book or just typing/pasting their name or email address in the box (so it works for external recipients too).

They get a meeting request as normal, they show up in the meeting organiser’s list of attendees, responses get tracked etc – but when any of the attendees looks at a meeting in their own calendar, they won’t see the names of anyone in Resources. Clever, eh?

Tip o’ the Week #119 – Using Outlook in multiple windows

clip_image002This week’s tip comes courtesy of Jon Morris, who is agog at the way lots of people switch between their Inbox and their Calendar, in Outlook. Hands up if you routinely use the Navigation Pane on the lower left of the main window, to switch between these two most commonly used folders?

OK, put your hand down now. People will stare. As an aside, the Navigation Pane was introduced in Outlook 2003, and was codenamed the “WunderBar”. Honestly.

Long-term ToW readers may recall Tow #10 (over 2 years ago), which covered some Outlook shortcut keys – eg press CTRL-1 to switch the current window to “mail” (whichever folder of email you last had open), CTRL-2 to “Calendar”, CTRL-3 for Contacts etc. That’s one way of switching the focus around, and certainly quicker than clicking on the WunderBar.

clip_image003Anyway, back to Jon’s tip. If you right click on any folder or any of the shortcuts in the Navigation Pane, you’ll have the option of opening that folder in a new window, so you can switch between (for example) your Inbox and Calendar windows, by any of the various means you might favour (ALT-TAB, WindowsKey+number, hovering over the application on the Task bar etc). This works well if you have multiple monitors, so you could (say) have your Inbox on the main screen and the Calendar/Task list on the second one.

Now the smart bit here is that Outlook will remember what windows you had open, what folders they were looking at, and on which monitor they were displayed, if you close the application down by going to the File menu and choosing Exit. Closing the app using the Window Close “X” or by right-clicking on the application in the task bar will not remember the window positions, so if you get used to leaving the Outlook application from its own file menu, you’ll get the same window setup every time you restart.

Tip o’ the Week #112 – Change Outlook’s startup folder

Productivity gurus wax on about how gaining and maintaining control of your never-ending to-do list starts with the way you prioritise, and how you build discipline in working through your task list rather than being distracted by less important “stuff”.

So, why is it that we stick with the default setting in Outlook, which starts up showing the Inbox folder, and with the most recent mail at the top…?
The only thing more distracting than looking at an inbox full of shiny new mail, is to have the new mail notification flash up in front of whatever else you’re doing, to tell you about it.

Check out the very first Tip o’ the Week – how to switch off the Outlook new mail notification. Try it out.
Live notification-free for at least a day; you can always switch it back on again if you need to.

If you’re on a Lync meeting and someone shares their desktop to show you a presentation (tsk, tsk), or you’re watching a presentation/demo on a big screen, feel free to berate the presenter publicly if they receive a new mail notification during the meeting.

Here’s a tip that Microsoft’s own internal IT training programme recommends: set which folder Outlook starts up in. When you launch Outlook for the first time, don’t have it go into your Inbox – what about opening your Calendar instead?

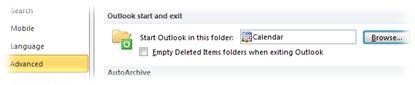
To change, go into the File menu, under Options then Advanced. Scroll down to the Outlook start and exit section, and pick your folder of choice. Simple as that – though if you routinely sleep and resume your PC, you might not be starting Outlook very often, so you may only see this occasionally. Continue reading

Tip o’ the Week #110 – Tracking Outlook responses

clip_image001Most of us regular Outlook users are well-versed in the Request/Response model of doing things other than email. Take an appointment in your own calendar: add an invited attendee or two, and you’ve created a meeting. What’s different? The meeting invitations were sent out and the list of attendees is listed and tracked.

If you’re invited to someone else’s meeting, you’ll see options on how to respond, and clip_image002 you’ll be able to look at the scheduling view to see who else is on the list, but you won’t be able to see how they’re responded to the invite (well not entirely). You may be able to see the details in the scheduling view (depending on whether the invited attendees have given you the permission to see their calendars).

clip_image003But if you organised the meeting, you’ll see further options, including the ability to check the tracking status – so you can see who has accepted, declined or just not responded to your meeting request.

If you didn’t organise the meeting, you may be able to open the calendar of the organiser and still be able to see who responded and how. Useful when you’re sitting in a meeting that someone organised, and you want to see who’s still planning to attend.

Unfortunately, when you look at the View Tracking Status tab, you’ll see the responses shown as a table, but unfortunately it’s not possible to sort or filter that list – so quickly picking out everyone who hasn’t responded from a long list of invited people isn’t so easy.

clip_image004Redmond resident Texan Steve Winfield pointed out a simple solution, however – click on Copy Status to Clipboard, and the entire list gets copied to the clipboard – fire up Excel and hit paste, and you’ll be able to quickly sort and filter so you can chase up the non-responders or the folk who declined.

When you’re checking the tracking status of a meeting request, you will go to your calendar, but it’s not the only kind of clip_image006tracking you might need to do.

If you send an email with a read or delivery receipt requested, or are looking for a voting buttons response, you’ll see your original email sitting in Sent Items but with a different icon on the clip_image008message . open the message and you’ll be able to see some tracking capabilities, which differ a little depending on whether you’re looking at delivery or read receipts, or responses to the voting request. Either way, this time, you can only see a static list, with no clipboard shortcut. If you’d like to copy the responses:

· Click on the top one, 

· Press SHIFT-END to select the whole lot

· Press CTRL-C to copy to clipboard

Now, it’s a snap to go into Excel, paste the responses and you’re free to sort & filter as before.

Tip o’ the Week #102 – When did someone really put something in their calendar?

I’ve been thinking about writing this tip since the ToW started almost exactly two years ago (yay!) but for various reasons, competitive advantage amongst them, I’ve held off. I figure it’s now time to relent and share.

genesis

The tip concerns the differences in Outlook between appointments, meetings, and meetings where you are the organiser. Huh? Well, an appointment is something you put in your own calendar. A meeting is created from an appointment when you invite someone else – or are invited by the organiser – to take part. Outlook exposes a whole load of variance in what you can do when you’re in each of these 3 scenarios, but in 2 of them – namely, appointment and being the meeting organiser, it doesn’t tell you when the appointment/meeting was created.

When you look an invitation sent by someone else, you can see not only when you accepted it, but when it was sent. Well so what, you might ask?

What if you look in your own calendar and see something you created, but don’t recall when? It can be quite handy to remind yourself when it was added – maybe you will find some emails around the same time that might give you more information on why you put that appointment in there.

The same rules apply when you’re looking at someone else’s calendar. What if you invite someone to a meeting (and this is where the competitive advantage bit comes in, perhaps), and they decline because they have a “conflict”. was the conflict merely an appointment they created after your invite. (covering tracks, perhaps)?

In a more benign scenario, what if you’re trying to bag a meeting room, but it’s booked out. maybe for a team meeting or some such. If you could see that the meeting was created 2 years ago, then you might contact the organiser to see if it’s still happening or even realise that the organiser no longer works here, and therefore a cancellation can’t be sent out to free the room, but it’s most likely not going ahead.

method

The beginnings of this method regards customising or designing Outlook “forms”. There’s a little more info on Outlook Forms in ToW#44 if you’re interested. In a nutshell, items in Outlook (appointments, messages, contacts etc) are simply a collection of fields, and use a designated – and customisable – form to display the fields’ values. In the example of a self-created appointment or a meeting you’ve organised, the standard Outlook form doesn’t display the date of creation, but it still exists behind the scenes.

To view the date, a simple way is to start by adding a new command to the “Quick Access Toolbar” that’s shown on the top left of your Outlook form:

  • Open the appointment or meeting you’re looking to get more information for, then click on the little down-arrow to the right of the Quick Access Toolbar.  then look at the bottom of the Customize list and choose “More Commands”
  • Next, change the “Choose commands from:” drop down to be “Developer Tab“, then on the left-hand side of the  dialog, scroll down the commands list to find Design This Form, (NB don’t choose “Design a Form”), then Add it to the list on the right by clicking the button. Press OK to return to the item. This will now put a new icon on the Quick Access Toolbar, that looks like a pencil, ruler and set square. Very retro design tools.

This should be a one-time exercise, that will now allow you to peek inside any Outlook item once you’ve opened it up (whether it’s from your own mailbox, or someone else’s calendar).

show me

Now, when you click on the Design This Form icon in the Quick Access Toolbar on an open item, it switches the form 
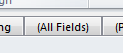
that’s being used to display that item into the “designer” mode, which shows any hidden tabs that the form might have (denoted as such by their names being in brackets). One of the hidden tabs on every form is “All Fields”, which lets you explore the values of every field that exists within the item that the form is displaying. Are you still with me?

Click on the All Fields tab and select “Date/Time fields” from the drop-down box, and hey-presto, you get to see 
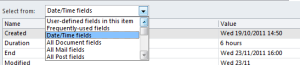
every date field – like the Created date.

If you want to explore the differences between the various item types in Outlook, try looking at “All Mail fields”, “All Contact fields”, “All Appointment fields” etc.

Tip o’ the Week #96 – Reining back Outlook’s file size

clip_image002

Outlook likes to cache lots of information on your PC – which is generally beneficial. All of the email in your mailbox, for example, is already on your hard disk, so when you open a message or an attachment, it can open it clip_image003quickly. This is a Good Thing. In fact, it’s the reason why Office 365 works.

One feature added in 2007 was that Outlook also cached other users’ calendars after you’ve previously opened them, so that if you open them again, the data is already there. That is also good (pretty much).

In fact, Outlook will happily trundle through a long list of calendars, updating them in the background: you might find that since it caches all those users’ & meeting rooms’ calendars, that you have rather a lot of space being consumed by the offline file. If you’re running a laptop or desktop with a traditional spinning hard disk, you probably won’t even notice – but if you’re lucky enough to have a Solid State Drive, where storage capacities are typically much lower, then it could cause you a problem.

Outlook’s OST file (that’s the offline cache), can get pretty large – by default (in Outlook 2010), it won’t warn you until the OST is 47.5Gb in size, and it won’t let the file grow to more 50Gb. Note that we’re talking about the size of the offline cache file, not the size of the user mailbox, which will typically be an order of magnitude smaller. Nevertheless, having such a big OST file will cause the machine’s performance to suffer somewhat, since it will be indexing all of the data as well as probably maintaining lots of calendars or other shared folders (as well as whatever is in your own mailbox). I first hit this problem when the Outlook cache file was taking up about one quarter of my disk space, meaning the PC was running low of free space.

To see your OST file size, copy %userprofile%\AppData\Local\Microsoft\Outlook to the clipboard, bring up the Windows Start menu and paste that into the search box and press Enter. That will open up the folder where Outlook keeps all of its offline files, so don’t worry if you see lots that you don’t expect. If there are any big files with a really old date, then they are not being used by Outlook and might be safe to remove… though take a backup copy just in case…

clip_image005How to reclaim your disk space

If your OST file is particularly large (ie several times the size of your mailbox – and you can find out how large that is from the File menu in Outlook), then there are a few things you can do to reclaim the space back.

Delete the OST

You could quit Outlook, delete the OST file altogether and then restart Outlook – causing it to rebuild the whole thing from scratch. The downside to this approach is that it will take ages to complete, your PC will need to re-index all of the content to make it searchable, and you might end up with a similarly-sized file anyway since it will re-cache everything your Outlook profile tells it to.

clip_image006Be rid of Calendars

It is possible to get Outlook to discard some of the data it’s cacheing – a simple bit of housekeeping would be to prune the list of other calendars shown on the list to the left of your own calendar, thereby reducing the amount of background work it has to do to keep them up to date, and reducing the size of your offline cache file.

You can remove them one by one (though this could be laborious, it at least will let you decide which – if any – to keep), or simply right-click on any groups of calendars and ditch the lot. You can always add people back as and when needed. Go on, it’s quite cathartic.

clip_image007Stop the cacheing of other folders altogether

If you’d rather not cache calendars at all, you can switch off the whole functionality – simply (!) go into File | Info | Account Settings | Account Settings, and then double-click on the Exchange Server account that’s listed there. Within the ensuing dialogue box, click on More Settings then Advanced Settings. Now, you can choose to just not download (and cache) the shared Calendars or other shared folders. The downside is that you can’t see other people’s calendars when you’re offline, but that isn’t important, you might want to look at this option.

Compact the file

It may be worth trying to reduce the size in your OST file, and if you have done either of the previous 2 options, then you will definitely need to compact it. Outlook will reduce the OST file size in the background over time, reclaiming unused space in the file, but if you make large changes by deleting lots of infomration, you will need to force it to do some maintenance. A word of warning though – this will take a long time. We’re talking many hours, maybe even more than a day – so, it’s one to do overnight at best or over the weekend.

clip_image008To compact the file in size (and mine went from well over 30Gb to less than a third of that), follow the instructions to get to the Cached Mode Settings above, and click on the Outlook Data File Settings button at the bottom, and you’ll see the properties of the data file. Click on the Compact Now button and wait. Oh, and you can’t use Outlook whilst it’s compacting, so do not try this during the work day….

Hopefully this will help you keep your Outlook OST file size in check. It will free up space, it will give your PC less work to do in keeping a list of calendars updated and maintaining the searchable index of all your data.

Tip o’ the Week #91 – So you’re OOF? Meh.

clip_image001[7]Now that Outlook, Exchange and Lync all provide a way of showing that someone is Out of the Office (aka OOF, not OOO), it should be no surprise when you send email to someone internally, that you get an Out of Office message.

clip_image001

Outlook’s tool tip tells you they’re out, Lync’s status icon shows the small * to indicate the same, and if you hover over the person’s name, you’ll see the same message shown at the top of the information balloon from Lync. clip_image003Maybe it’s time to ditch the receipt of old-fashioned OOF message altogether, at least by taking them away from your inbox…?

Fortunately, a simple Outlook rule will take care of that. We’ve talked about Outlook rules before in previous ToWs… #9 and particularly, #29. ToW #29 introduced a way of having multiple rules working to remove everything from your inbox that met a bunch of conditions, meaning that what’s left is likely to be important. If you get too many emails, check it out.

A short bit of theory

Now, you might not know this, but every “item” in Outlook (eg. email, contact, appointment) is really just a blob of data with some specific fields defining the shape of the item – obvious stuff like when was it created, sent, who was it sent to, what was its subject, etc. One of the more important fields is the “message class” – that’s the information that tells Outlook how it should be displayed, and what kind of functionality the user will have. Outlook needs to use a very different form to display a contact, for example, than a regular email message, yet underneath there’s actually very little difference other than which fields exists and what their values are.

So what? Well, it turns out OOFs use a specific message class, and can therefore be filtered out based on that.

clip_image005Create the rule

To set up the rule, go to the Home tab in Outlook’s main window, and under the Rules icon, create a new one. Now, go straight to Advanced Options button in the lower right. In the Condition(s) page of the rules wizard, scroll down and look for which is an automatic reply and tick it, then click Next. Now clip_image007you can decide what you want to do with it (Delete? Move to another folder, etc). It’s pretty self-explanatory after this point.

One nice side-effect here is that Outlook typically strips a lot of its internal information on an email that is sent externally – so if you get an OOF from a customer or partner, it won’t have the classification of being an automatic reply… it’s just a regular email as far as Outlook is concerned. So the filtering will only remove OOF messages from internal people and will leave external OOFs in your inbox.clip_image001[4]

If you’re feeling particularly adventurous, you could create other rules to handle messages based on type by using the “uses the form name condition… Just make sure you don’t squirrel important messages away too deeply, in case you might actually need to read them…