|
There’s a school of thought that it’s easier to read light coloured text on dark backgrounds than the other way around, even though we’re conditioned to have black text on white paper. It’s largely a personal preference thing, so might be worth having a play with a few options within Office & Windows (and a few other apps) to see how you fare.
Go into Settings -> Personalization -> Colors to tweak the app mode on your PC. The Edge browser inexplicably ignores the app mode on the main settings page, but does implement its own light/dark theme, accessed via the Settings (click or tap the … in the top right, then Settings).
Users of Visual Studio and the Azure Portal probably know this already but they also feature dark themes…
|
Month: November 2016


Tip o’ the Week 355 – How to buy a FBTV
| Tip 355, eh? This week’s tip is quite timely so we’ll skip over 354 and come back to that later.
[Warning: these next 2 links are a bit racy – don’t click on them unless you’re familiar with Danny Boyle’s controversial film of 20 years ago…] Trainspotting is coming back, after all. Like every technology which moves on, buying flipping big televisions can be a minefield. Time was, you got the biggest you could afford and accommodate, and that was it. But now, a blizzard of new logos and features means you need to know what you’re doing otherwise a savvy sales person might tuck you up with a set that’s obsolete immediately. Does anyone still watch 3D TV? The Dawn of 4K At the beginning of the HD wave, TV manufacturers were selling “HD Ready” sets, which had no means to receive High Definition broadcasts and only natively supported 720p (ie a resolution of 1280×720) from external sources like Blu-Ray, so a step up compared to standard definition (which had a resolution of up to 720×576), but not quite as much as Full HD 1080p (of 1920×1080). The 4K revolution – otherwise known as Ultra-HD or UHD – promises resolution a of 3840×2160, meaning a Full HD picture would fill only one quarter of a 4K screen, even if 3840 isn’t exactly 4K (as that would be 4096)… 4K content is available in some areas, now – via cable or satellite (like Sky Q for UK users), but mostly through on-demand services such as Netflix or Amazon, or even streaming from YouTube. Since most 4K TVs are “Smart”, the various apps for those services are likely to be built-into or at least downloadable for the TV in question. Do check the apps you need are available for the screen you’re thinking of, and don’t be disappointed if existing apps don’t feature 4K content, yet – Planet Earth II’s cutesy animals & stunning visuals don’t show up on 4K, sadly. HDR If you’re going to buy a 4K set, make sure you get one that supports High Dynamic Range, or HDR. Photographers may know about HDR already – essentially, it’s a process of taking several photos with different exposure settings and combining them together to make one image that’s detailed and bright. Here’s an illustrative example:
HDR on moving images means you can combine the detail and contrast of a low-exposure shot with the brightness and definition of a high-exposure one. Here’s a discussion about HDR TVs and why, basically, you shouldn’t buy a 4K TV without it. Arguably, HDR will have a more positive impact that the extra resolution of 4K. There are 2 different HDR standards, and that introduces some confusion – there’s proprietary Dolby Vision, and open standard HDR10. Dolby Vision isn’t part of the Blu-Ray specification per-se, and if you buy a 4K Blu-Ray player then it most probably won’t have Dolby Vision support. It’s arguable about whether 4K Blu-Ray is even viable – paying a premium for a higher-definition version of a format (Blu-Ray) that may still be growing, but not as fast as its predecessor (DVD) is shrinking: good luck with that. The future’s all about streaming, really.
OLED vs LED/LCD Another decision matrix when choosing the screen, is whether to go for the newest OLED display (which still attracts a pretty premium in the price), or to get a more established – and perhaps, more refined – technology such as LCD with LED backlighting? See an in-depth discussion about the two technologies here. Ultimately, if you buy OLED now you may get a better screen but in a year’s time, you could probably get an even better one at the same price as an LCD screen costs today. Entry level 55” OLED screens will skin you the best part of two large, whereas you can get a similarly-featured 55” LCD 4K with HDR, for little more than a monkey. Right, now that’s that done. Off to watch that new Top Gear in 4K. And on that bombshell… |


Tip o’ the Week 353 – Killing me Softly, part II
 Back in the day, when it was an ambitious plan to have a PC on every desk and in every home, one frontier that was foreseen was the battle for the living room. Before the advent of cheapo streaming sticks, the only way to consume media on your big telly (apart from stuff broadcast to it or recorded already) was to invest several large in a dedicated Home Theater (sic) PC, or htpc. Back in the day, when it was an ambitious plan to have a PC on every desk and in every home, one frontier that was foreseen was the battle for the living room. Before the advent of cheapo streaming sticks, the only way to consume media on your big telly (apart from stuff broadcast to it or recorded already) was to invest several large in a dedicated Home Theater (sic) PC, or htpc.
There was also the promise of being able to tune your htpc into broadcast TV signals and use it like a PVR, though this took a long time to be realised internationally, what with the Windows Media Center was a standalone version of Windows XP, then an optional features in premium versions of Vista and Windows 7, before being put to the sword in Windows 10. RIP WMC. What now? Well, the fashion for having a full-size, fan-blaring PC in your living room is largely done away with, as games consoles and the aforesaid streaming devices (along with built-in SmartTV functionality) largely make the idea redundant, but for some uses (a student bedroom maybe, or a PC in the den) it could still be a smart idea to be able to watch and record TV signals, for which there are a profusion of freely available alternatives to WMC. Let’s look at one of the most widely used.
· UK users might choose all manner of tuner hardware, but you could try getting a £20 USB cheapie tuner from your favourite bookstore, or any other DVB-T2 tuner hardware (T2 includes Freeview HD, whereas simple DVB-T is just standard definition). · · It’s quite possible that if you install NextPVR and it doesn’t work properly, you’ll need the right codec software, such as the LAV filters – get the latest installer from here. It’ll also allow DVD playback. It’s even said to be possible to stream UK Freeview channels to a Kodi addon running on machines that don’t have their own tuner hardware, and non-UK types may be able to receive those channels away from Blighty. Apparently. |
 Microsoft’s early entrance into this market was a project called “
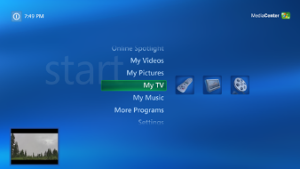 proliferation of delivery methods, formatting standards for TV channels, means of describing the program guide etc.
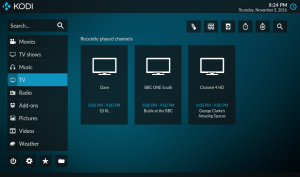 Kodi.tv
 Install
 Tip o’ the Week 352 – Skype for Business Custom Presence
|
Many years back, OCS added the capability to present different custom states too – but it’s always been a bit of a faff to achieve consistently. Skype for Business doesn’t make it a great deal easier, but thanks to a few enterprising types, it is still possible to enable without too much trouble. Custom presence allows users to have up to 4 custom status fields defined, in the status of Online, Busy or Do Not Disturb, which can be used to show even more context – like I’m in a meeting but can IM, or I’m busy presenting with customers so don’t disturb. There are a couple of ways to achieve said nirvana…
The downside is that the Presence Tool starts with 4 blank presence states, so you can’t easily modify what you have already – and setting 4 empty entries will clear all custom presence from the client. Also, it only lets you choose online or busy as the available status. A more complex but more comprehensive approach would be to use a technique developed by MVP Ståle Hansen, to use a PowerShell script to create the config file which sets presence states. It’s relatively straightforward if you follow these steps:
The benefit of using this script rather than manually configuring everything is that it can be easily shared with others, or just re-run across multiple PCs so you have a consistent set of presence options. Now look at your friends in Skype for Business to see who has the most creative custom state …
NB: If the above doesn’t work (and you’ve checked the registry entry points to a correctly-formatted XML file etc etc) then it may be a policy on the server that’s preventing it. One possible solution would be to host the XML file on a suitable web site that lets you reference it directly using https:// and point to that in the registry instead. |


Tip o’ the Week 351 – Searching the GAL
|
When Exchange The Directory fed the Global Address List, or GAL, that was visible in the Exchange “Capone” mail client and later in Outlook – so that’s what you see as the address book when looking stuff up (tip: at the main Outlook window, just press CTRL+SHIFT+B to open the Address Book).
Ever since Outlook 2003, the predominant way of looking up the address book is to refer to an offline copy called the OAB, and there’s a bunch of management that can be enacted on the OAB generation, by the operator of the Exchange Server. By and large, it’s a seamless exercise that users won’t notice, but you do sometimes see a bit of lag – like if a change is made to the directory (a user’s mailbox being created or deleted, for example), it could take many hours to make it down to the address book on the client. Also, not all information is stored in the OAB, so looking for pictures or reporting line information, for example, will need your client to talk to the directory server, meaning it seems to lag behind everything else and won’t work at all when you’re offline.
Since 2000, Exchange has used the Windows Active Directory rather than Exchange’s own; in fact the AD traces its own roots back to the Exchange one – including various detritus of the X.500 standard that was part of the original Exchange directory).
One of the seemi If you want to search other fields, just change the Search radio button to “More columns”, enter your text and hit Go. Sadly, you can’t use wildcards or anything, but you can join different searches as the logic seems to be combining all the words in an AND rather than OR fashion – so searching the Microsoft GAL for “ewan” currently returns 7 users and one DL, but searching “ewan UK” brings back the 3 of us based in the UK. There’s one thing to be aware of, though – the matching is still pretty basic – it only searches Still, if the naming convention is orderly enough, it could still be useful – at Microsoft we do have a reasonably consistent naming scheme, so try searching for all the Steves in Edinburgh, or all the Patels in Hyderabad (hint – look at the location or department fields, and if the first few characters denote the building name or the division of the company, you could use that to search against). Or the Mc-somethings who work in building 9…? [The location field for Redmond employees starts with their building number – so 9/1234 would equate to room 1234 found on the first floor of building 9 – the trailing slash in the search example above stops results from building 99 being returned as well] |


