#27: Lookup Image Reverse Using

With all the fuss about AI in recent months (the latest being OpenAI teasing some futures with GPT-4o, and potentially raining on Google’s I/O parade that followed the next day), it’d be easy to overlook that elements of artificial intelligence have been infusing the software and services we all use every day, for years. Google are even revisiting an old Microsoft brand too

Text, handwriting and speech recognition, language translation, cognitive understanding – they’re all milestones to what people might think represents true AI, and using elements in conjunction with massive amounts of data has given us some incredibly useful capabilities.

One such is being able to do a reverse image search – the idea that if I have a thing, or a picture of it, how can I find out more about it, or where it’s being used elsewhere online? Copyright holders might want to search for unauthorised use of their materials, or we can even use the technique to tell us more about what our phone camera is looking at.

clip_image002Visual Search

The Bing search engine has had a visual search feature for many years – that’s right, some people do still use it, even by choice rather than because it’s the default or due to a nag screen.

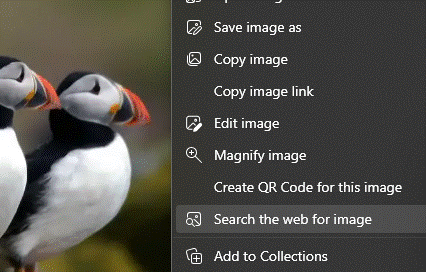
The simplest way to use Visual Search (if you’re using Edge browser and Bing is your search default) is to right-click on an image and choose the Search the web for image option, which feeds the picture into the visual search page.

clip_image004

This will show you other places on the web that feature the exact same image (and in different sizes, too) as well as displaying other, similar images.

clip_image006

If the pic you started with is a recognizable place or person, it may offer a suggestion of what/who it is, with links to further info..

clip_image008

If you’re not using Edge and/or Bing isn’t your default, you can use it by copying the image you want to the clipboard (or grabbing a portion with the Snipping Tool), the go to the Bing homepage and click on the Image search icon.

clip_image010

Just paste your image in from the clipboard (press CTRL-V, or if you’ve switched on Clipboard history, WindowsKey-V will let you choose from previous ones too) to run it through image search. You can, if need be, adjust the area being searched for, by clicking the Visual Search icon towards the bottom of the main image, then dragging the handles to crop the area you want – picking out a single person in a group photo, for example.

clip_image012

Google offers the same kind of functionality, too – from Chrome with Google search as the default, choose Search image with Google,

clip_image014

… or try search by image from the homepage…

clip_image016

… and paste the selected image in there.

You’ll see slightly different results from the different search engines, so it’s definitely worth trying both out. The Bing user interface is arguably nicer than Google’s but in the end, it’s the results that count.

Mobile apps

When it comes to dealing with the real world rather than online photos, smartphones clearly provide a great starting point. The main Google app has the same initial image search UI as the web site but lets you point your phone camera at something and extract text from it, identify what it is and find out more. The Bing mobile app (and Microsoft launcher on Android, if you use that) does similar things but nowhere near as effectively, judging by the results it returns.

clip_image018

There are many specialist mobile apps for identifying specific things, like differentiating between a plant or a weed, but it’s worth trying the Google app first.

clip_image020

The Bing mobile app purports to do similar things, too…

clip_image022

Nul points

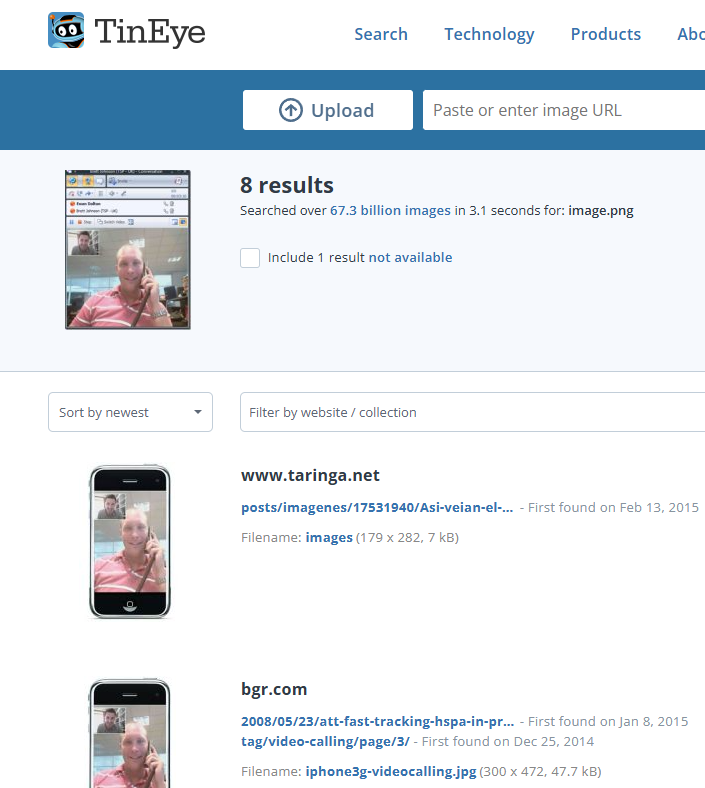
Coming back to looking for pictures, if you don’t get any meaningful results from search engines when trying to match an image, there are specialist services like TinEye, which offer deeper reverse image search.

Take this image from a blog post many years ago, before mobile video calls were really a thing*. Searching Bing/Google for it brings nothing of note, but TinEye found various sites which took part of the image and repurposed it – various nutjobs used the image in “news” that the next gen iPhone was going to have video conferencing capabilities, neatly overlooking the fact that the main subject of the photo had a curly-wired handset to his ear…

Screenshot 2024-05-16 160755

* in fact, Orange launched the SPV M5000 smartphone – aka HTC Universal – in 2005,

clip_image025

and it was the first 3G “phone” which had a front-facing camera for doing video calls. It wasn’t very good.

685 – Browser searching

Screenshot 2023-06-06 181351Research from a couple of years back showed that the most-searched-for term on Bing.com was “google”. While it seems crazy that people would type the name of a search engine into the search box of another, it’s possible they were entering “google” into a box on their homepage or even in the browser address bar, and that term was sent to bing.com as a query, rather than sending the browser to google.com.

If you’re using Edge and have Bing as the default search experience – other search engines are available – then you may see the prominent search box in your new tab page, but it’s worth remembering that the address bar at the top of the browser is also a search box. You can jump to the address bar in Edge or Chrome by pressing ALT+D, which also selects the current site’s URL (if there is one) so you can edit it or just replace by typing something else.

clip_image004If you start putting the name of a site into the address bar, you’ll be offered autocomplete suggestions from your favourites and your previous browsing history, so it may be very straightforward to jump to not just the website but a specific and previously accessed page within.

Entering a site name and pressing CTRL+ENTER will add the https://www. and .com bits so you don’t need to; therefore, to go to the BBC website, you could press ALT+D bbc CTRL+ENTER and you’d go there directly.

Although the address bar will ultimately use your default search engine to query a word or phrase that doesn’t appear to be a web site address, you can force it by starting to type ? in the address bar, then enter your search term after the question mark.

clip_image006Some sites will allow the browser to search within them by adding the site name and then pressing TAB. Whatever text you enter after the TAB will be sent to the specific search page of that site. Not all sites support this method, but many common ones do, like Twitter, Amazon, YouTube and more.

clip_image008Go to the search engine settings in Edge (or jump to the address bar and enter edge://settings/searchEngines) to see which sites are set up already. You can add your own “search engine”, which means you can direct Edge how to search within that site.

Click Add to include one of your own, using the appropriate site URL while replacing the bit where the search term is specified with %s – eg searching the OneDrive photos section for “dogs” would give a URL of https://photos.onedrive.com/search?q=dogs.

Give the Search Engine a shortcut name you want to use and then paste the modified URL and hit save. Now, in this example, typing photos | TAB | cats | ENTER would seach OneDrive for cat pictures.

If you are a Microsoft 365 user then you might be able – if it’s been enabled for your tenant – to search internal work documents and Sharepoint sites, just by typing work | TAB | etc. It’s on by default, but admins could also give you custom keywords / shortcut words too.

clip_image010Finally, on the topic of Searching in the browser, it’s possible to search across all the tabs you have open; start typing something in the address bar and you’ll see the option of filtering that search to apply to Work, history, favourites or tabs.

clip_image012Alternatively, press CTRL+SHIFT+A to kick the search off, type in the word of phrase you’re looking for and it will filter the list of current tabs to show only ones that match.

To quickly jump to that tab, use the up and down keys to select the one you want, and press Enter.

661 – Finding mail and slimming down

clip_image002

Learning how to find stuff in email is crucial, since many of us get so much that we let it accumulate until eventually it becomes a problem. Sifting through the many cc’ed work mails, or finding the order confirmation email in your personal mailbox amongst all the other stuff, we’re more reliant on search than ever.

This is a topic that has been covered numerous times in previous ToWs – 573 – Searching in Outlook and 504 – Searching Outlook for example – but is worthy of a revisit since we may have a chance to pursue the fallacy that is Inbox Zero over the next few weeks. And maybe it’s a time to find and delete the special offer emails and once-in-a-lifetime invitations that may be clogging up our personal mailboxes too.

Work mail

Dealing with desktop Outlook on the PC, there are plenty of tools available to help you find specific messages, in fact there’s a whole toolbar full of them.

clip_image004

As you look to search mail that meets your chosen criteria – it’s from someone in particular, maybe with a keyword in the subject, or that you know has an attached PowerPoint file, you’ll see that clicking the filters and options inserts the actual commands that will drive clip_image006the search, into the Search bar positioned at the window’s top.

Remembering a few of these means it’s quick and easy to search for mail from a person (you don’t need the quotes, really, and you could use just a part of their name) by typing straight into the box. ALT+Q (for query?) sends your focus straight onto the search bar, so if you’re a keyboard warrior, you could ALT+TAB to Outlook, ALT+Q and enter a search command, before your clip_image008 mouse-toting colleagues have even clicked a toolbar. While we’re at it, remember that CTRL+number jumps to the location on the (now vertical) icon bar on the left, so CTRL+1 will normally be mailbox, CTRL+2 is calendar, CTRL+3 contacts, and so on.

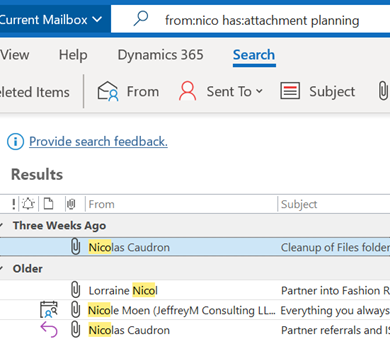
Commands could also be used to filter on properties of a message that are not so easily visible through the UI – eg from:ewan messagesize:>10mb or from:nico sent:”last week”. See here for more examples of the kind of thing you can type. Look under Recent Searches to re-run ones you’ve typed before.

Reducing Mail Bloat

clip_image010Is your mailbox size is starting to look under strain (look under the File menu to see how big your ‘box is and what the limit is)? With an active work mailbox in M365, it shouldn’t be much of a risk unless you genuinely never delete anything, but a quick way of identifying the big rocks and getting rid of them may be needed occasionally.

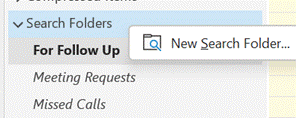
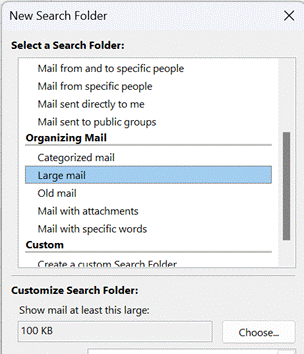
clip_image012clip_image014You could run a one-off search for all big mail as per the instructions above, or for extra control try creating a Search Folder. Expand the folder tree on Outlook’s left side, and scroll towards the bottom, to locate the Search Folders hierarchy, right-click on the top of the tree and choose New …

This will bring up a wizard which creates a query across your entire mailbox or other data file, but which looks like a folder; it’s visible only in Outlook desktop (ie not in web or on mobile) but can be a great way to locate stuff that might be filed away in the darker recesses of your mailbox.

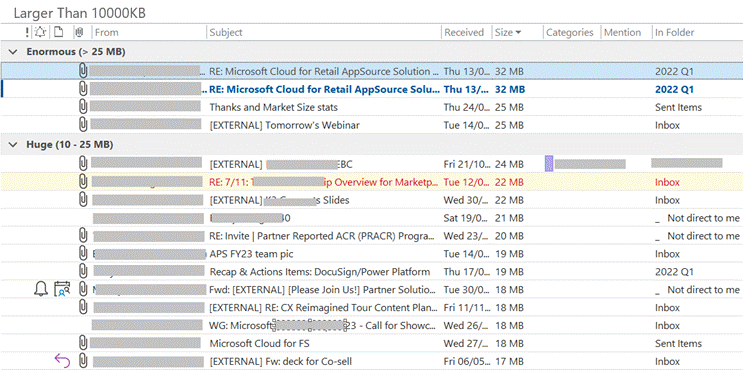
You can choose from some set templates or do your own custom thing entirely. The age of this feature is somewhat given away by the default value for “Large mail”… click the Choose button and enter something meaningful (like 10000 for ~10MB).

clip_image016

This should give you a few easily deleted big mails to at least get any short-term capacity problems dealt with.

Right-click on the Search folder and choose Customize… to give it a better name, or to tweak the criteria.

Home email

If you have a Hotmail / Outlook.com etc mailbox, there may be a more pressing size issue, as over a period of years you might have been signed up to a newsletter every time you buy something online, and without realizing it, those could account for gigabytes of data bloat on your mailbox. If every notification from Amazon or eBay is 400K, they soon mount up to a meaningful size.

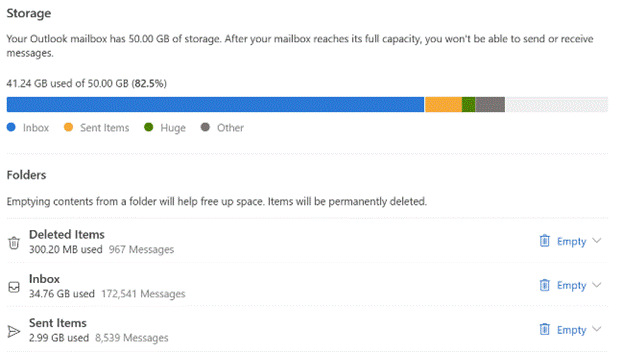
clip_image018If you have a free Outlook.com account, you should have a 15GB mailbox quota and if you have the account associated to a Microsoft 365 home or work subscription, you’ll get 50GB.

To check, go into Settings and search for Storage.

The UI for Outlook.com is simple and effective, but one thing it doesn’t do a great job of is handling message sizes.

clip_image020Sort by size and you’ll see a group heading showing which emails are clip_image022the largest (displayed by default with the biggest on top), but nowhere can you find out what the actual message size is.

If you want to do a mass clean-out of your Outlook.com account, then you could try sorting by From, however the UI won’t let you click on the group heading to select all emails from that sender and make it easy to delete them.

The Windows Mail app on Win11 doesn’t offer Size either, not even to sort by.

clip_image024Sometimes, the old ways are the best – you get much more functionality if you add your Outlook.com account to full-fat desktop Outlook, allowing you to change the view, see and sort by message sizes etc. Oh, and yes, you can even set up a Search Folder too. Now, tidy away!

This is the last “regular” Tip o’ the Week until January.

If you’re still here next Friday, look out for next week’s special edition – it’ll be a belter.

646 – Finding stuff in OneNote

clip_image002[6]Many people ❤️ OneNote. It has evolved much over the ~20 years since it sprang from the “Scribbler” project at the turn of the century and was released in the Office 2003 wave, under the name which the developers disdainfully referred to as “Onay-no-tay”. A recent update to the OneNote strategy for Windows was covered in Tip #632.

clip_image004[4]There were other OneNote tips a few weeks previously, in Tip #617, including OneTastic, a great addin to the traditional desktop app – the Metro Modern app never had an addin capability.

As well as powerful macro capabilities, which can do things like generate tables of contents or sort pages and other works in ways that the base app doesn’t offer, the OneTastic addin includes the OneCalendar application – also available to install separately – which lets you see which OneNote pages were edited on each day.

If you keep a note of every meeting, stored in different places – by topic, by customer etc – then this is invaluable when it comes to finding notes, as you can see what you last wrote on a given day.

Of course, OneNote has searching capability where you could look across notebooks for key words. There is the ability to Tag notes too, and you can search across notebooks for tagged content.

clip_image006[4]A powerful yet somewhat hidden search capability in desktop OneNote is also available – you can press CTRL+F to search on a given page, or CTRL+E to run a simple query across multiple places, for where a particular word is mentioned.

clip_image008[4]Look, however, at the “Pin Search Results (Alt+O)” option at the bottom – it opens search results in a pane to the side, and lets you sort by different criteria, e.g. date modified.

This ALT+O option can only be invoked from within existing search results, so if you want to find all your recent notes with a searched-for word, press CTRL+E to start, then ALT+O and search by date modified to see the results clustered by month.

642 – Finding work stuff

Data storage has become very cheap over the decades – a while ago, ComputerWorld wrote an article, saying that when it was founded 50 years previous, a 1MB hard disk would cost you $1M, and in 2017, that would work out at $0.02. 5 years later, $0.02 would get >1GB, more than 1,000 times as much.

clip_image002[4]This profusion has turned many of us into pilers – what’s the point of organizing data and deleting old stuff, be that files, emails, camera roll photos?

Outlook has a pretty good search function built in. OneDrive photos has some great organizing and filtering capabilities (like On This Day, or if you have GPS enabled on your camera/phone, you can easily group photos by the location taken from).

clip_image004[4]Still in OneDrive, there is also some AI-based tagging of your pics, which can sometimes be a bit hit & miss… but more often than not gets it about right.

While browsing “All Photos”, if you mouse-over to the right, you’ll get a scrollable timeline too (similar to the Windows Photos app), so you can quickly jump to a reference date.

Assuming you’re using Microsoft 365 / Office 365 at your workplace, there are other ways to find stuff that is more work-related, like documents, email and messages. One easily overlooked source is the “new tab” experience within the Edge browser.

clip_image006[4]The content on the default home page can be customized in a variety of ways, from choosing whether to show a background image or keep it clear; to displaying content from various “news” providers and clickbait advertisers that Microsoft News / MSN has elected to present to you, or hiding that altogether.

You can do some filtering of that content too, though for work purposes, many people may want to leave the page layout in “Focused”, which puts a link bar at the bottom and hides the content to be a scroll away.

Edge Profiling

If you have a “Work” profile (or you only have a single profile) and it is connected to your work account – ie your Microsoft 365/ Office 365 email address rather than your personal one – then you’ll see a “Microsoft 365” link within the list of content providers, which gives you a simple view of your most recent documents, SharePoint sites you visit and a whole lot more. To learn more about this Edge Enterprise tab, see here.

clip_image008[4]

Also, you’ll see the search box containing your company name – it uses Bing to search for whatever you put in there (somewhat controversially, regardless of what your default search engine in the browser is…). Edge doesn’t give you the option – like IE used to – of starting a tab with a completely blank page, though there are hacks to make that work.

clip_image010[4]If you stick with the standard new tab, it will also give you the choice of restricting your search to “Work”, so looking at documents and the likes. You’ll see a list of content sources clip_image012[4]displayed on the left side as tabs, allowing you to filter what you’re looking for or where you want to search.

There’s a fairly new one that searches “Messages”. At least for now, that means Outlook and / or Teams messages, but it could be really useful when trying to remember if a conversation you had was in email or in a Teams chat.

A quick way to jump to this section is to go to aka.ms/messages

– regardless of which browser you’re using, as it uses the Bing.com/work back end.

573 – Searching in Outlook

clip_image002A reader recently got in touch to ask for help in finding stuff in Outlook. The search capability within the application most of us use most of the time has evolved considerably throughout its life, with a prominently placed search bar now adorning the top of the main window. When you click into it, lots of helpful filtering and searching capabilities are offered in the ribbon below.

clip_image004It’s worth getting to grips with a few simple text search terms, though, so when you’re typing some search term you can direct Outlook to particular items. Helpfully, using the options in the menu will actually build the query that is fed to search, so you can type them in future. Simple quick wins include things like using from:name to show only clip_image006emails that originated from a particular sender.

Or has:attachment, which will only show you mails that have other files attached. Combined with a few other criteria, you can filter the results of your search pretty hard, rather than sifting through them. Adding some other smarts like received:”last month” can streamline some more. For more info on search terms, see here.

The scenarios our reader posed, though, were specifically around searching in the calendar – eg, do I have a meeting in my calendar with a particular person? Or what recurring appointments are due to expire this month?

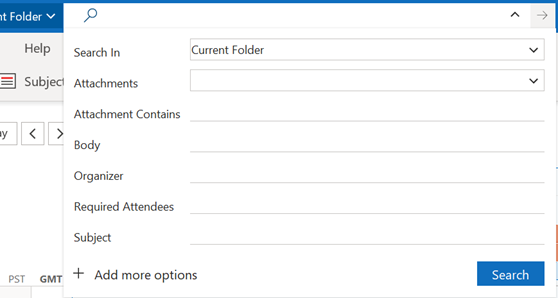
If you navigate to your Calendar and click the down-pointing arrow to the right of the Search box, it will display a clip_image008small form with series of other fields you can complete, in this case relevant to appointments rather than messages.

Click + Add more options to bring up a picker that lets you add even more – such as whether the meeting is a recurring one, or if it shows in calendar as Busy or not. Selecting the options builds the query as before, so you can see a variety of defined names – like organizer | organiser (depending on your locale) or requiredattendee:.

Coming back to the original question; if you want to find all future meetings in your calendar with anyone called Tony, you could type something like requiredattendee:tony start:>today. And if you want to find out which clip_image010recurring meetings are expiring soon, start by searching is:recurring start:>today. That will show you a list of future recurring appointments, but not give all the info we’re looking for since the default results view doesn’t show anything about the pattern of recurrence – so right-click on one of the column headings of the search results and select Field Chooser, where we can add some extra columns to the view.

clip_image012Now, in the pop out window, change the filter from Frequently-used fields to All Appointment fields, and scroll down to find Recurrence Range End. Now drag and drop that field into the column list, then click on it to sort descending so you’ll now see all the meetings that are set up with a recurring pattern, ordered by when that pattern is due to end. For added context, you could put Recurrence and Recurrence Pattern on there too.

clip_image013

Don’t be alarmed if some of them are due to keep happening until a very long way into the future. We’ll probably have stopped using email by then.

History Lesson

Before Outlook arrived as part of Office 97, users of Exchange Server had an email client and a separate calendar app (Schedule+; that’s why some diehards still say things like “send me an S+”, meaning send a meeting request). Both would maintain a connection to the server and would chat back and forth, only downloading data when a message or attachment was opened. Although this put something of a penalty on the network, it meant there was no need to cache large amounts of data on a PC hard disk. Outlook replaced both the mail and S+ clients, but maintained the same synchronous connection to the server.

Outlook 2003 and Exchange 2003 changed the default model, since PC hard disks were getting much bigger and cheaper, so it made sense to have Outlook deal primarily with a cached copy of the user’s mailbox, bringing all kinds of performance benefits to both end user and to the operators of the server back-end. One really notable improvement was the ability to run fast searches against mailbox data that’s in the cache, rather than having to execute searches on the server.

Prior to the cached mode, the best-case scenario for running a search was the server returned messages that fit a particular query asked by the client – mails received this week, mails with FOO in the subject line etc. If the server had indexed the relevant properties (received date, subject etc), it was pretty quick at sending back the results. If the user wanted something more in-depth, it was a punishingly slow process as each message would need to be picked up and inspected to see if it met the query – so searching for every email with a particular word in the message body text would be laborious. Three cheers for cached mode and client-side indexing.

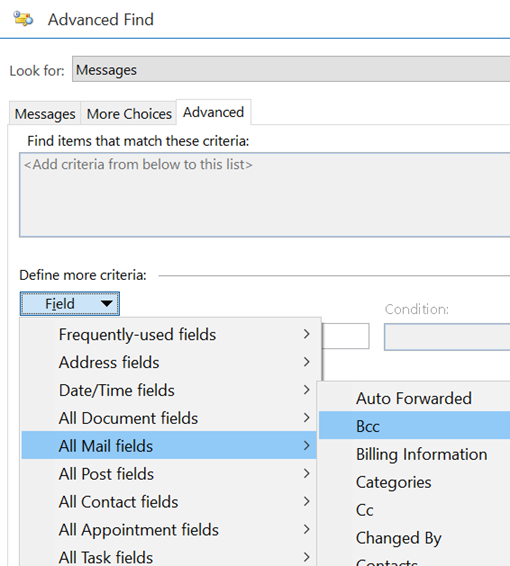
clip_image015If you look at Advanced Find in Outlook today, though, you’re staring into a time vortex that transports you right back to the late 1990s, as it hasn’t really changed, even if the speed of getting results back will be noticeably better since you’re almost certainly pulling them out of a local copy of your mailbox.

The first couple of tabs on the Advanced Find dialog let you search for mailbox items that fit some common criteria – but the third tab is a window into how Exchange stores and categorises messages, appointments, tasks etc.

clip_image017You can start Advanced Find from the Search Tools menu option as above. Or press CTRL+SHIFT+F.

Aside: most apps use CTRL+F to invoke Find – try it in Word, Excel etc – but in the mail client, CTRL+F forwards a message instead. Find out why, here.

The idea here is that you can build a query based on properties of messages – and when you select the Field from the extensive drop-down list, it would let you choose appropriate filters (some, like Flag Status or Receipt Requested would only have a couple of possible values, but others would let the user enter text, date or numeric filters).

Not all of the fields are used for much these days – eg InfoPath Form Type harks back to the days when the now-defunct InfoPath could be used to create mailable forms – but having a poke around in Advanced Find can give a curious user some insight into how Exchange and Outlook organises their data.

504 – Searching Outlook

clip_image002Many moons ago, Outlook search was a laborious process – you’d enter a word and Outlook would chunter through every message in turn to see if your desired text was contained within. In the days clip_image004when you a few emails, that was fine, but when you have many thousands of messages, it’s not viable.

15 years ago, Microsoft bought a company that made an add-in called LookOut and since then, deep search capabilities have been added in a variety of ways, now provided through the Windows Search service.

clip_image006A feature that was added into both Outlook is the “Top Results” section in search results – essentially providing what the search engine returns as the most relevant content, rather than necessarily the most recent.

How useful this is might depend on how and when you use Outlook search – if you’re looking for a way to return very specific results, it might be more of a distraction than a help (ie if you’re a natural piler, you might use Search as a normal way of retrieving stuff rather than an occasional tool for finding something in particular).

clip_image008clip_image010Should you find the Top Results section annoying and/or distracting, it can be easily disabled by going into Search Options within the Search tab on Outlook’s ribbon, and clear the  “most relevant search results” option.

clip_image012Do so, and normalcy returns.

Top Results also appears in Outlook Web App (outlook.office.com), in the consumer Outlook.com and in Windows Mail – and it doesn’t appear that you can disable it: much to some users’ chagrin. Turn to Uservoice or Feedback Hub if you feel similarly.

To get more out of Search in the desktop Outlook app, it’s worth understanding how to be more specific – even using just a few keywords will help you narrow the results. Search for from:bob, for example, and all results will be mails that originated from someone who had “bob” in their display name. Narrow the search even more by adding terms like sent:yesterday, about:pricing or messagesize:enormous as well.

clip_image014You can use various tools in the Search bar to filter your results, too – it might even be quicker clicking the big paperclip than typing hasattachments:yes. To discover more search terms, click the + More option in the search bar and have a play.

Tip o’ the Week 492 – TAB and Search

clip_image002The Tab key on your computer has its roots in the Tabulate typewriter function, which let you align type to defined (even modifiable) stops, so you could easily type tables of text and numbers, like invoices and so on.

In short, Tab could be used to left-align text, and is still used in modern typing, especially in word processing and in writing code. People who type space-space-space-space rather than a single TAB press still exist, though.

As well as the many features invoked by the Tab key in modern Windows, though – like WindowsKey-Tab to look at the timeline or the more common ALT-Tab to switch between programs – there’s a new capability for Edge browser users that might be worth looking out for.

If you’re using the Edge Preview – the Chromium-based version that has recently been pitched as Enterprise-Ready (for testing at least) – there’s a feature that has been enabled, which lets you search within a website rather than going straight to your clip_image004favourite search engine and without needing to go to the site’s homepage and perform a search within.

clip_image006Start by typing the site’s URL in the browser address bar, and you may well see a prompt to press Tab to search within that site.

clip_image008This is a feature that has existed in Chrome for a while, but now appears more prevalent in the new Edge. The prompt showing up depends on the website implementing an OpenSearch capability, which is used to plug some query into the search engine behind the site, and how well it performs depends on whether that site search is any good.

Try Microsoft.com TAB search term ENTER and you might just see how many apps that match your word in the Microsoft Store there aren’t, but try Amazon.co.uk TAB Surface ENTER and you’ll have the opportunity to buy Surfaces and many things associated with them. Try maps.google.co.uk | RG6 1WG (what? No Street View?)

Perhaps most useful is when you want to try something in a search engine other than your default; so if you normally use Bing, you’ll know that typing a phrase in the address bar on its own will cause the browser to search if it can’t resolve your term to being a URL. Well, if you type google.com TAB term ENTER then it’ll try that same search over there, rather than you needing to go to the search engine homepage first.

Tip o’ the Week 438 – Bing’s Visual search

clip_image002In an effort to attract users to the perennially under-rated search engine Bing, the service launched a “visual search” function some time ago (ToW 397). There have been some recent updates to mobile apps, enabling search capabilities from an image. Similar images will be identified or major subjects could be spotted, using AI technology to try to figure out what’s in the image, as well as find related info.

The Bing Search app and the Edge browser for both iOS and Android have been updated, as has the Microsoft Launcher for Android – each has added a little camera icon to the Search box, which makes it easy to take a pic and upload it to Bing for analysis. The Bing app can also scan QR codes and the Launcher can scan barcodes too. More features are promised for all 3 methods of app-based visual search, and for the Bing web site itself.

To use visual search in the Launcher, swipe from the left at the home screen and you’ll get the “Feed” page (a customisable summary of news, activities, apps, contacts etc), the top of which has a search bar with a camera and a mic (though if you’ve used the barcode scan in the Launcher, the camera will be replaced with a scanner symbol – just tap that as if to scan a new barcode, then tap the barcode with an X in the top right to revert back to camera).

If the results you get aren’t quite spot on at first, you could direct visual search to focus on a particular part of your snap – tap the magnifying glass in the top right, move the edges of the area to filter out any peripheral nonsense, and you may find results improve.

clip_image004

Tip o’ the Week 393 – Searching in OneNote

Tip o’ the Week OneNote. Both the full-fat trad Windows app version (OneNote 2016), and the Store (just “OneNote”) application that has a portion of the functionality and a simpler UI. One side effect of using OneNote a lot, though, is that you might have a huge  amount of old pages in your set of Notebooks, especially if you share notebooks with your team, and end up with a Notebook for each project you’re working on.

If you’re using the regular OneNote 2016 application, and go to search content (by entering the search term into the box on the top right, maybe by just pressing CTRL+E to jump straight to it), you may find that the results you get include a lot of old content which isn’t all that easy to parse – the name of the notebook occupies much of the column showing the location of the matching page or section, there’s no date of last update or any means of sorting – so it’s hard to know what’s recent and what might be years old.

If you click on “Pin Search Results” at the very bottom of the results list, or press ALT-O, then you’ll see the results appearing in a pane to the right of the OneNote window, where you can change sorting and filtering options, and see the date the pages were last modified.

Referring to this option as “Pin” may make you think it’s a bit more permanent (such as pinning to taskbar or Start, or pinning to a menu somewhere), but it’s as easy to dismiss the results pane as it is to invoke it in the first place – just click the X in the top right of the window pane, or the close option on the drop down arrow which also lets you resize the pane or even move/undock it from the main Outlook window altogether.

There’s no obvious equivalent of this search granularity in the OneNote store app.