Tip o’ the Week #189 – Outlook View Tips

clip_image001Outlook 2013 introduced some changes to the way the standard inbox view is presented. It’s basically a good thing, though if you have a lot of email and a small screen, it will certainly reduce the number of items on your default view. This means that once an email is (say) 15 from the top on your mailbox, then it’s off the screen and, for some people, it might as well be dead.

You could adopt an Inbox Zero policy and keep your inbox to as few items as possible, or you could admit defeat and become a piler like most people. We have computers to search stuff for us, so why does it matter if we delete or file things away? Meh.

Anyway, there are a few tweaks you can make to your Outlook view if you don’t much like the new version. Let’s look at a comparison between Outlook 2010 and 2013:

clip_image002

Outlook 2010                                     

clip_image003

Outlook 2013

It’s easy to see the screen real-estate effect – though 2013 is clearer, it’s a little larger.

clip_image005If you’d like to restore the view to more like 2010:

  • In the main Outlook window, go to the View tab, and look under View Settings
  • Click on the Conditional Formatting button.
  • Create a new rule (Add), and call it something like “Look like 2010”. Choose a Font by clicking on the Font button, and select “Smaller”. You may want to try some italic and bold settings just to spice things up a bit, but you can always go back and change it later.
  • Press OK, and when you are prompted, say that it’s OK for this rule to run on everything (since we haven’t created a condition for it to apply).

Now this will apply to all messages and will reset the default view to have smaller “From” lines.

clip_image007If you’d like to change the way unread messages are displayed (where, in Outlook 2010, they were just emboldened and with an appropriate message icon), repeat the exercise above but instead of creating a new rule, just edit the “Unread Messages” rule – set the font and colour, and party on!

There are many other inbox formatting tips which will take the views back into the mists of time – if there’s demand to find out more, maybe I’ll cover them in future ToWs.

Tip o’ the Week #185 – Outlook, offline!

Previous ToW entries have covered the need to sometimes tell Outlook to pipe down and let you get on with what your job is supposed to be. Where, after all, does it say on your job description, “Sits in front of a screen reading & writing email all day”?

The Pomodoro time management method is one potential solution to the problem, where the user forces themselves to focus for a period of time by avoiding distraction. The continuously excellent series of Photo Tips from Robert Deupree (JR) featured a simpler solution…

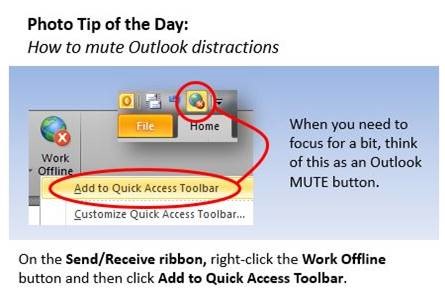
Robert also recommends a shortcut for the keyboard junkies so dedicated to extreme productivity that they can’t afford to lift their hands away to touch a mouse – to toggle Online and Offline modes in Outlook, simply press ALT+S then W.

When Outlook is offline it obviously won’t receive any new email, but it will let you work on existing mail, calendar etc and you’ll still be online for Lync distractions, and able to while away time browsing the web.

Whilst on the subject of Outlook and distractions, do yourself a favour and switch off the new mail alert – it’s even more intrusive in Outlook 2013 than previously. We all get enough email that we don’t need to know when another one has arrived, so try it now and you can always switch it back on if you feel that nobody loves you anymore.
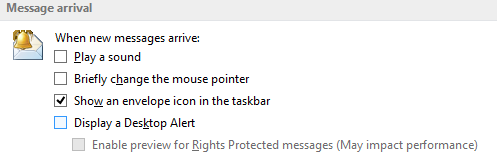
Simply go to File / Options / Mail within the main Outlook window, and tweak the settings as required:

Tip o’ the Week #183 – Screen Grabs on Windows 8.1

clip_image001

If you’ve taken the plunge and updated to Windows 8.1, you may have spotted a mix of improvements (like the updated Search pane behaviour which needs a little getting used to, but works well), and some funnies (compatibility issues with IE11, internal tools like GMOBI or CRM not working so well, etc). All in, a happier upgrade but one which is quite clearly still a preview.

Now, one of the first downers some people have spotted is the fact that the Search charm has nabbed the WindowsKey+S combination – it makes more sense than Win+Q, so what’s the rub? Well, OneNote uses WindowsKey+S to grab portions of the screen, either for pasting into notebooks or just sticking the screen grab into the clipboard for later use.

There are alternatives to the handy OneNote process; like using the Snipping Tool, though like many other such utilities, it can’t grab portions of the Modern UI apps. Never fear, a solution is at hand…

If you’re a fan of Win+S, you can re-establish a way of screen grabbing by following the steps below…

· Fire up a PowerShell windows with admin privilege – press WindowsKey+X, and select Windows PowerShell (Admin) from the list. (note that in Windows 8, this option was “Command Prompt (with admin)” – is the shift to PowerShell in Win8.1 the death knell for the black-background command line?

· Copy and Paste the following command into the command line and hit Enter:
REG ADD "HKEY_CURRENT_USER\Software\Microsoft\Office\15.0\OneNote\Options\Other" /v ScreenClippingShortcutKey /t REG_DWORD /d 65 /f

· Either reboot your PC, or…
… kill off the Send to OneNote Tool (32 bit) application from Task Manager (press CTRL+SHIFT+ESC), then restart the application by pressing WindowsKey+R and entering ONENOTEM.

Now, you should be able to catch a screen grab by pressing WindowsKey + A. Not as obvious as Win+S, but it’s better than nothing.

Tip o’ the Week #176 – F(u)11 screen ahead

clip_image001

This week’s tip might seem a little obvious to some, yet partially unknown to others. Internet Explorer has offered the capability to display a page in full-screen mode, since IE4. Just like the “content, not chrome” ethos of the “Metro” Modern UI design language, reducing the various window borders and controls, menus, toolbars etc (aka the “chrome”), leaves more room on screen for the web page or other application/document content.

Now, we all know there are two versions of Internet Explorer 10 – the Modern UI version (full-screen, hiding all controls unless you swipe from the top or bottom of the screen or press WindowsKey-Z to display the address bar, tabs list etc), and the more traditional browser with tabs, icons to control the browser behaviour, menus etc. If you’re using the desktop version of IE, try flicking to and from full screen mode by hitting the F11 key – the same shortcut clip_image003that’s been in IE for 15 years.

Other applications have full screen modes too, and some, like OneNote, also use the same familiar F11 – making your current OneNote page fill the entire screen (apart from the taskbar, unless you’re hiding that too), so useful wclip_image004hen you’re note-taking in a meeting and want to make it clear to anyone peering over your shoulder that you’re not just doing email or wasting time.

Office 2013 applications let you switch to/from a full screen view too, by clicking on the Auto Hide option at the top right of the “Ribbon” – like the browser or clip_image006OneNote applications above, it’s a handy way of making the most of screen real estate, especially if your laptop has a physically small screen. Like a Surface, for example.

Tip o’ the Week #165 – Take the tour

clip_image001When was the last time you actually read the manual? Or actually skimmed over the Terms & Conditions you’re agreeing to when clicking on a button somewhere? Sometimes, attempts to make things easy aren’t exactly riveting.

Now and again, though, it’s worth assuming the role of true n00b: you might learn something. That’s right, gents. R.T.F.M.

In this case, try taking the tour in the New Office applications – select New from the File menu on Word, Excel and PowerPoint, and you’ll see a selection of tips clip_image003to get the most out of the new apps.

The Excel tour is particularly snazzy. The first tip is pretty cool – it’s all about the awesome Flash Fill function, which can spot common patterns in the data you’re dealing with… like the first names or surnames in a list of email addresses.clip_image005

The tours finish up with Getting Started sites for Excel, Word and PowerPoint… try out the in-app tours, and have a look through these sites and you might even figure out some new tricks.

#12: Which Copilot do you need?

Microsoft has a habit of over-pivoting to use the same terminology for lots of different things, sometimes even giving the same name to related but quite specifically different things. Think OneDrive / OneDrive for Business, OneNote / OneNote for Windows 10, Skype / Skype for Business, Teams and Teams (work account) etcetera. At times in the past, everything was seemingly appended with “.NET”, or given a name starting “Windows…” “Live…” or “One…” (or all three).

Here’s the Copilot

With all the hoo-hah in recent months about “Copilot”, it can be confusing to pin down exactly what it is – a search engine, chatbot, a tool to write code, or something that will draw pictures while summarizing your email?

clip_image002There are whole standalone experiences like the Bing search which was originally Chat but has now been renamed Copilot …


… and the Edge browser integrated Copilot panel, activated by the icon in the top right. Preview versions of Windows have a Copilot button on the taskbar with the ability to tweak things inside the operating system. New PCs will soon have a Copilot button on their keyboard.

clip_image004

There are other “Copilot” things coming out all the time. Want some help in writing a Power Automate cloud flow to integrate stuff between systems? If you’re a salesperson, Copilot in Dynamics Sales lessens the drudgery of keeping CRM up to date. Or if you’re a developer, Github can help you write better code, more quickly. Some are free and some need you to subscribe to.

It’s very likely that these things come from different sets of technologies under the hood, though Microsoft is increasingly talking about there being a “Copilot platform” behind each of these experiences. Things are certainly moving quickly – as BizApps MVP Steve Mordue commented in his chat with Charles Lamanna. Expect the effect of AI on regular applications to move from being an addon or a side panel, to fundamentally changing the apps we use – why build a BI dashboard if you can just ask the questions you need or even have the information suggested to you?

Copilot Pro and Copilot in M365

The recently-launched Copilot for Microsoft 365 integrates priority access to some of the public web services (akin to ChatGPT Plus), and adds in-app integration with Microsoft 365 and Office applications, promising also to be able to put the back end magic to work across your own organization’s data too. It’s been in preview for a while, for certain customers – initially it was invite-only for some of the biggest (who still had to pay for it) but recently has been extended to anyone with a Microsoft 365 Business subscription.

Somewhat confusingly, Microsoft at the same time announced “Copilot Pro”, which is really for individuals and integrates with Microsoft 365 personal or family subscriptions, for a monthly fee of $20 (or £19 – forex, huh… though the USD amount doesn’t include tax whereas the GBP one does).

If you’re not a Microsoft 365 Personal or Family subscriber you won’t see a lot of the value which Copilot Pro adds, on top of the GPT-4 Turbo and DALL-E 3 usage. If you are already using a M365 home subscription, then for your £19/month you’ll see Copilot functionality showing up in the desktop and web versions of the Office apps. (NB – that’s £19 per user; note that the £8/month you might pay for M365 family gets you up to 6 people… they’d each need to be enrolled into Copilot Pro if you wanted all to get the benefit, so it could work out quite expensive).

clip_image006Select a block of text or a page in OneNote and you can summarize it or build a To-Do list on what actions it might contain. Word shows a little Copilot icon on the left of the text editing block, and will offer to draft some text or rewrite what’s already there.


clip_image008

Excel’s analytical Copilot is still in preview (and works on files already saved in OneDrive/Sharepoint only), while PowerPoint offers some frankly amazing abilities to generate fluff from thin air, or jazz up the dreary text-laden slides you might already have.

Buying and deploying Copilot for Microsoft 365 business users – available to small business users on Business Standard or Premium, or Enterprise users who have E3 or E5 licenses – is something an organizational admin would need to control, so if you’re an end user then you’ll need to wait until they decide you’re worth it.

The business version (priced at £30 per month, inc VAT) gives you everything that Copilot Pro does, and also access to your own organization’s date, and, integration with Teams, where Copilot can prepare summaries of meetings you have, or offer a chatbot that can find other information in different sources.

Should I buy it?

Of course, the free Copilot experience can be very useful, but it’s not integrated into the Office apps at all.

If you’re an Office apps user and have a M365 family or personal subscription, then it’s worth taking a look at Copilot Pro – the first monthly subscription of £19/$20 will give you a chance to have a proper play with Copilot functionality, and then decide to keep it going or cancel the subscription and it’ll expire at the end of the month. It might even give you an idea – as an end user – what Copilot for M365 could give you, and thus petition the powers that be to enable it for your M365 org.

One downside of the M365 business Copilot licensing model is that, although it works out at $30/£30 per month (give or take), it’s an annual commitment which must be paid up front. So if you’re looking to kick the tyres, try the $20/£19 a month Pro first.

Tip o’ the Week #154 – Outlook 2013 searching – reprise

clip_image001Sometimes, the best bits of content benefit from revisiting, improving or just being done in a different way. It was good enough for Sgt. Pepper, and a mainstay of any self-respecting 1970s concept album (try and hear the Supper’s Ready lyrics at the end of the Squonk reprise in Los Endos, for example. Now, take the anorak off and get back to work). Actors reprise previously-starred roles, to keep the tills ringing, if not the critics singing.

Anyway, this week’s Tip revisits and reprises a topic that’s had a bit of coverage of late – namely, searching in Outlook 2013. See ToW’s passim: #130, #144… and numerous other snippets.

Woody wrote a blog post about today’s topic – namely the way that Outlook now handles searching. Outlook has had built-in search capabilities for ages, but in 2013, it’s much easier to switch between searching within just the clip_image002current folder (eg Inbox) and searching everywhere. It has also introduced further granularity like searching across just the current mailbox (or archive file).

Care must be taken, though – you might search for a term and find that the results include folders where you’ve archived stuff, or could be your Sent Items folder… so take it easy on the Delete key. The “Current Mailbox” | “Current Folder” selection is remembered for certain folders, so might change as you move from one to the other.

clip_image004If you do search across multiple folders, when you hover your mouse over a result that’s of interest, and you’ll see a little bubble which tells clip_image005you the folder that it’s in.

Alternatively, right-click on the “ALL Unread” menu immediately below the search box and choose “Folder”, and you’ll see your search results grouped by the folder the messages come from.

Tidy.

Tip o’ the Week #151 – dates, leaks, sides

clip_image001First, an update on last week’s ToW. Both Daryl Gywn & Will Thompson pointed out a quicker way of displaying the date & time (past intern-ship in the STU must have developed a keen sense of observation that other roles don’t develop) – simply display the Charms by…

  • swiping from the right if you’re a touchy sort,
  • by throwing your mouse into the bottom right corner then moving it up if you’re more 2-dimensional,
  • pressing WindowsKey+C if you’re such a productivity demon that you can’t even suffer the time to take your hands away from the keyboard. Press the same again to get rid of the Charms so you can get back to cranking out whatever you were doing before you needed to check the time (eg the email 1 minute after the deadline for sending that email).

Now that you’ve tried out each of these, or at least settled on your favourite, you’ll spot that when you display the Charms (regardless of which app you’re in, even if looking at the classic Desktop), you’ll see the day, date & time is displayed in the lower left of the screen, in nice big friendly letters and numbers. Easy!

Another erratum, of sorts – if you installed “The Time” application from last week’s tip, you would be well advised to check for and install any updates, since one or two have been issued for the app (via the Store – see ToW #149 regarding app updates). It turns out the app was originally doing something entirely legitimate (at least the developer says so, and the customer is always right after all) but which was causing the “Runtime Broker” application to leak memory like one of those round things with all the holes in it. If you’re seeing error messages from Windows 8 saying it’s running out of virtual memory, then you’re very likely to be getting hit with this issue/side effect. The Time app is presumably doing its otherwise legitimate things differently now, as it’s all fixed.

clip_image002To check on the status of memory leaks etc, simply fire up Task Manager (press CTRL+SHIFT+ESC, or else you can do all manner of faffing about with the mouse or 3-fingered salute keys if you must), and click on the Memory column to sort. Don’t be alarmed to see Outlook take the lion’s share of your machine’s resource – it does that. You may find other Office apps and Internet Explorer are shortly behind – worry not, they’re just being efficient by using the memory the system has so they can work better. Honest.

Anyway, if Runtime Broker is running at, oh, about 300 times as much as you might see above, then you have a leak. The cure? You could right-click on it and End Task, or you could do the more considered thing and just reboot. After first making sure you have the latest versions of your Windows Store apps installed… Thanks to Louis Lazarus for pointing out the leak.

This week’s tip, if you’re still reading

Assuming you’ve fought through the prologue, this week’s tip comes from a question posed by the Dynamic Phil Newman: when using multiple monitors, Phil wants to be able to have a spreadsheet open on each, so he can copy/massage/paste the data from one to the other – and he found that Excel insisted on opening multiple workbooks up in the same window.

Now it’s possible to tweak the system to change what happens when you just double-click on a file – open it in the same instance of the application if it’s already running, or fire up a new instance just for your file… but it’s a palaver and one default is only as good as the other. Sometime you want different workbooks to be in the same instance of Excel (historically, you could only move sheets between open workbooks if they were opened within the same instance, but that’s no longer the case).

clip_image003There are pros and cons to both approaches of “open in a new instance” / “open in the current one”, but the pros in former case would mean you can park different windows in different places, either on your one screen or across your array of screens should you have them.

There’s a quick way of firing up a separate window, though – if you already have Excel running or if you’ve pinned Excel to your task bar in Windows 8, just right-click on the icon and instead of clicking on the sheet you want to open from the most-recently-used list, just click on Excel 2013 (or maybe if you’re still rooted in the past, on Excel 2010 or earlier). This launches a new window of Excel, in which you can open your favourite sheet and run it alongside whatever else you’re working on.

clip_image005You can, of course, have multiple sheets opened within the same instance of Excel, appear side/side – by using the View -> Arrange All or View Side by Side to show them tiles next to one another, where you can even enable scrolling of the documents at the same time (so as you’re moving down or across through one, the other keeps pace).

As an advert for old Tips o’ the Week, this was also covered a couple of years ago … here.

Tip o’ the Week #144 – Office 2013 Templates

A short and sharp tip this week, courtesy of Louis Lazarus, concerning the way the New Office clip_image002handles template files… and how to configure search in Outlook 2013 to be a bit more fullsome. See more templates online, and now, over to Louis…

When you create a new document in Office 2013 with Word, Excel, etc, you are not given a choice of the templates on your local machine.  You can fix this by…

1. Click File, Options

2. Select the Save item in the menu on the left

3. Enter the location of your templates folder in the “Default personal templates location”…
clip_image004

4. clip_image005Click OK

Now when you select New, you will see a choice of Featured or Personal Templates – click on PERSONAL to see your templates…

clip_image007Outlook 2013

By default Outlook 2013 only includes your emails for the last 12 months.  You will usually see a message saying something like “there are more items on the server” – clicking the link sometimes returns more items and sometimes does not.  To get rid of this message and have all your items sync’d to your PC…

1. Click File, Account Settings…

2. Click Change… and drag the slider to get All mail items…
clip_image009

3. Click Next and then Finish

4. Now all your mail will be available offline.

Tip o’ the Week #143 – Share your calendar externally

Organising our home lives is increasingly done digitally, from keeping in touch with friends and making arrangements over social networking, to just the basics of communicating intra-family – how many readers have multiple laptops or <cough>tablet type devices(soon to be Surfaces for Microsofties at least, thanks Steve!) at home? Have you ever IM’ed your significant other even if you’re both in the house at the same time?

Well, as an adjunct to the merry-go-round of keeping your home life under control, Tim Hall suggested this week’s tip, and although it concerns something that’s actually been possible in Outlook for several versions, it’s a hugely useful feature which is perhaps easily forgotten.

We’re all used to having other people in the company being able to see our calendar, so they don’t make arrangements with or for us that conflict with other appointments. Wouldn’t it be a good idea to share the calendar clip_image001with your nearest and dearest?

Well, you can. Go into Calendar in Outlook, and in Outlook 2013 (other versions are available, though the UI may vary), look at the Ribbon on the Share part of the main Home tab. You’ll see the ability to Publish Online – with a few clicks, you can have Outlook push some or all details of your calendar to an external service on Office.com (after prompting you to login with your Office.com/Hotmail account ID), and which can in turn be consumed by invited Outlook.com/Hotmail etc users if they too are running Outlook. You choose who to invite, and they get emailed a link to add your calendar straight into their Outlook client. Simple as that.

There are a few other options which could prove more useful if not quite so straightforward to set up. What if your other half isn’t using Outlook? How about being able to sync a copy of their calendar onto your Windows Phone…? We’ll look into these in a future Tip o’ the Week, but if you’re keen to press on, you could look into a free third party addin that replicates content between two calendars, meaning you could keep a copy of your work Calendar in a household Outlook.com account, and sync that to the Windows Phones of everyone in the house…