Tip o’ the Week #267 – Synchronising Outlook Signatures again

clip_image001

Hot on the heels of last week’s missive about how to snaffle more storage space, once again we turn to OneDrive to solve a problem. First, let’s journey back in time to recall some previous tools.

Once, there was a peer-2-peer (P2P) file sychronisation product called FolderShare which was acquired by Microsoft nearly a decade ago; it allowed files and folders to be replicated amongst multiple machines, essentially for backup or for making sure you had your stuff (music, pictures etc) everywhere you needed it.

FolderShare begat Mesh or Windows Live Mesh, which became Windows Live Sync and eventually all became part of SkyDrive, as the latter became less of a simple place-to-put-stuff-in-the-sky/cloud and more of a storage mechanism with a means to sync and replicate it onto multiple places. Now OneDrive is part of Windows, and as well as giving away oodles of online disk space, it’s the mechanism by which Windows 8 and 10 users can synchronise settings between computers. It’s getting better and more granular all the time, too.

One of the nice features of Live Mesh/Sync was the ability to automatically keep several settings on multiple PCs in sync with each other – like IE favourites, or settings from Office like dictionaries, templates and email signatures. Though it’s now obsolete, this was first covered in ToW #69, back in 2011. Email .sigs used to be a big deal.

Windows manages to do a good job of keeping PC-specific settings in sync between machines, or even just backing up settings from one machine to the cloud using OneDrive – so once you’ve signed in to your shiny new machine with your MSA, then it’s quite amazing how much of your stuff just appears. But one thing that doesn’t is your Outlook email signature. If you want to back up your .sig and also make it/them available on multiple PCs, you need to work a bit harder.

The Dark Art of Symbolic Links

Worry not, however. Through a cunning bit of sleight of hand, it’s possible to fool dusty old Outlook into thinking that its Signatures folder is stored in the usual place, however we all know it can be moved into OneDrive and therefore made available to multiple machines. This is similar to the technique of replicating Desktop which was covered a little while back, except that instead of changing a registry setting to tell Windows where the folder is, we need to create a special kind of folder, which is really just a redirection to somewhere else.

Here’s the method – it’s best to close Outlook while doing this.

  • Find your current Signatures location – try pressing WindowsKey + R then paste into the run box, %appdata%\Microsoft (which opens the special location that many applications will use to store files that clip_image003pertain to how they work).

  • Then look for the Signatures folder – select it, copy it and paste into your OneDrive folder (in Explorer; paste it into the OneDrive\Documents folder, for example).

  • … rename the original Signatures folder to something like Signatures.old

  • clip_image005Now, we need to create a Symbolic Link to make something that looks like a folder at the same location, but points elsewhere – start an elevated command prompt (on Windows 8 or 10, press WindowsKey-X then press A to start an admin command prompt).

  • Now create the symbolic link by entering the following as one line into the command window:
    mklink /d %appdata%\Microsoft\Signatures %userprofile%\OneDrive\Documents\Signatures
    (if you know your OneDrive folder is in a different place, then substitute the 2nd parameter for whatever is appropriate – maybe D:\OneDrive\Documents\Signatures, for example)

  • If you now go back to the %appdata%\microsoft location from the 1st step, you’ll see the Signatures folder clip_image006with a special icon showing that it represents a link rather than a real folder. Open it to check that your signature files – as stored in the OneDrive folder from earlier – are showing up in there as expected. Feel free to close the command window.

  • Now, on each other PC you want to synchronise with, go back to the first instruction and repeat, except that you don’t need to do the “copy to OneDrive bit” since your Signatures folder is already there – in other words, you create the Symbolic Link to the local replica of the OneDrive folder, and Outlook will think that the data is in its own appdata location.

  • Don’t worry if you get to the 2nd step on a destination PC and realise the Signatures folder doesn’t exist – it’s only created when you first set up a .sig

Tip o’ the Week #264 – BCC people to a meeting

clip_image002There’s a great deal of etiquette bound up in email communications – and it varies by culture and sometimes by country. Some people politely make the point of always addressing the recipient in an email, and in thanking them at the end, whereas others apparently look on it as a badge of honour to contain everything in a single terse line with no capitalization. Especially when it comes to OOF messages.

One of the cardinal sins of email management is in misusing the BCC function – you know, the ability to copy someone on an email without showing their name to everyone else. BCC can be very handy at letting one user or group know what is being said to another, without exposing the former’s email addresses or in fact making it explicit that they’re aware of what’s going on. Maybe duplicitous but clip_image004handy at times.

Whatever you do, do not BCC large distribution lists. Some people think they’re doing a group a favour by replying-all to some thread and BCC’ing the group so it doesn’t get sent any of the subsequent replies… but what that often will do is circumvent any rules that members of that group have set up to fire all emails sent to it, into a folder. Now, post-BCC, everyone will probably receive your email in their Inbox, all the while wondering why.

What About meeting requests?

clip_image006BCC is very handy when you’re emailing a group of people – maybe sending an external mail to a bunch of customers and you don’t want to inadvertently share everyone’s address with each other.

Funnily enough, one scenario where BCC would be most useful is when you want to invite lots of people to a meeting – an event, a party, etc  – and there are plenty reasons why it might be best that they don’t know who else is being invited. Yet, there is no BCC option on meeting requests… it’s just not there.

clip_image008But feat not, intrepid readers – it is possible to effectively BCC people on a meeting request, by inviting them as Resources. There are basically 2 ways that most of us will add names to a meeting request – either create it as a meeting in the first place, or create an appointment, then…

· …either type their names into the shown-by-default “To” box, or choose Scheduling Assistant to add people by just entering their names in the list, to invite them.

· … or add names to your request by clicking on Invite Attendees (which actually turns an appointment into a meeting, as meetings are appointments where other people are invited – ya falla’?), then click on the To button (or Add Attendees button).
clip_image010 This brings up a dialog box that will expect you to select people from the address list, and select them as Required or Optional attendees (does anyone ever use Optional?). Or, in fact, Resources – the thinking being that the address book could have entries for resources like meeting rooms or even bookable equipment, that you could invite to your meeting thereby claiming it for your exclusive use.

Now, if you’d like to invite people to a meeting and have the request be sent out to them but not show their address to anyone else, just stick them in as Resources – either by selecting them from the address book or just typing/pasting their name or email address in the box (so it works for external recipients too).

They get a meeting request as normal, they show up in the meeting organiser’s list of attendees, responses get tracked etc – but when any of the attendees looks at a meeting in their own calendar, they won’t see the names of anyone in Resources. Clever, eh?

Tip o’ the Week #259 – Manage your Christmas Cards in Outlook

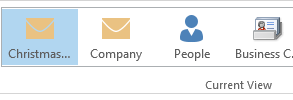
Happy New Year! For many of us, time to chuck out trees, and pack away any and all decorations, never to be seen again until December ‘15. Before you recycle the cards you may have received over the holiday season, here’s a quick way of using Outlook to make the job of sending your cards that bit easier.
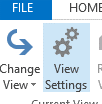
It involves creating a new view and a couple of custom fields within the Contacts function in Outlook – as has been mentioned before on ToW, when Outlook views any item (an appointment, a contact, a task etc), all it’s doing is using a particular form to display a bunch of fields. It’s possible to easily extend those items with your own fields and there are form editing capabilities too, but we’re not going to use them today. This tip might look a bit daunting but it’s really quite simple, and it’s something you’ll only have to do once – it persists in your Contacts folder so is available on all PCs.

If you have multiple monitors, then it might help to put this email on the 2nd monitor as you may not be able to easily switch to read the instructions whilst you’re setting things up. Or maybe just print it out.

Create a new view

Firstly, go into the Contacts folder then select the Views tab, and select Change View, then Manage Views to see a list of views that apply to your Contacts folders. Click the New… on the top right.

Select Table as the type of view and give it a name like Christmas Cards, then click on OK to create and start editing the new view.

Click the Columns button and remove everything from the “Show these columns” list on the right hand side, except for Full Name.

Now, it’s time to create a couple of new columns which will be visible in the view and can be used to 
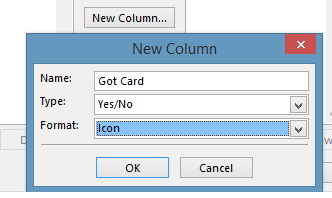
track interesting bits of info – like whether you sent a card to this contact, and if you got one in return. Click on the New Column button and for the name enter Got Card, then choose Type Yes/No and leave Format as Icon. Press OK to create, and repeat the process for the Sent Card field.

Now, select other relevant fields from the chooser on the left – try selecting 
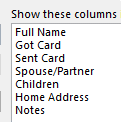
All Contact fields from the “select available columns… drop-down box, then pick some of the more esoteric contact fields that already exist – Spouse/Partner and Children fields will let you remember who to make the cards out to, and Home Address and Notes are pretty self-explanatory.

Once you’ve created the view, resize the columns as appropriate (elongating address, for example). Now, you’re probably looking at a contacts list that’s got 1,000 entries of people you principally do business with, and a handful of friends you might send cards to. The next trick is to filter out people you want to be in the list.


The nice thing about using the Table type view is that you can edit in-line, ie. you don’t need to open up the contacts forms to change the details. Since you’ve just created the Got… and Sent… fields, none of your existing contacts will have a value for any of these fields.

If you click on the Got or Sent fields, you’ll set it to be either yes or no. Try locating a few of your friends in the list and tick these fields, maybe fill in Spouse and Children while you’re at it (and now’s a good time to do that, as you’ll probably have all their names on the cards you received).

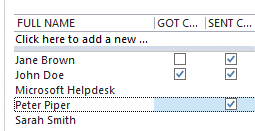
OK, now we have a quorum of contacts tagged with Got & Sent attributes, go into View Settings and click the Filter button, then switch to the Advanced pane. From 
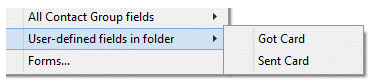
the Field drop-down box, choose User-defined fields in folder and add Got Card.

Change the condition to exists and press Add to List.

Repeat the same process with the Sent Card field, then press OK. Finally, before saving the view, you might 
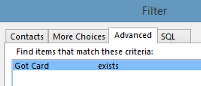
want to change the Sort order to Full Name.

Now if you press OK to save the view, you should see your contacts list filtered to show you only the entries that you have tagged as having some value for both Got Card and Sent Card.

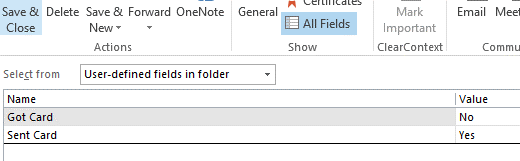
If you want to continue adding contacts to the list, simply open your existing contact (maybe from the main Outlook contacts view), then click on All Fields, and select the fields from the user-defined fields in folder – you can then set Yes or No for each of the custom fields, and that contact will now show up in your Christmas Cards view.


If you want to ditch someone from the list, open their contact, look under All Fields, select from user-defined fields in this item (not user-defined fields in this folder!), select the field and Delete it.

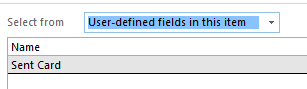
So what’s the point of all this faffing about? Well, in 11 months’ time when you come to do your next round of cards, just select the view in Outlook and if you select File / Print and select Table Style, you’ll get a nice sheet or two of all the details and addresses you’ll need to write all your cards.

Tip o’ the Week #251 – Toasting a new email message

You got a new email – hurray! Back in the early days of using email, it was expected practice for your email program to play you a little fanfare, pop up a message box to tell you that you’ve got mail, put an envelope in your system tray etc.

In the last decade, nobody in most companies needed to know they got a new mail. We all get far too much of it, and yet most email programs notify you by default. Stop that, it’s silly.

The inspirational Prof Randy Pausch advised switching this off: he delivered a great talk on Time Management, and watching it is a better way of spending 90 minutes than pretty much any other productivity-enhancing measure. Children of the 1970s and 80s in the UK will remember Why Don’t You?, with its somewhat perverse advice to “switch off your television set”.

Well, stop reading this email now and go and watch Randy’s Time Management video (same link as above you click junkies).

Still here? If you’ve never heard of Randy, he was diagnosed with pancreatic cancer in 2006 and sadly succumbed less than 2 years later. In the interim, he delivered “The Last Lecture”, an awesome (and we’re not talking Microsoftie, “hey, that was super-awesome!” kind of awesome, more the laughing-out-loud, tears-welling-up and rapt-attention kind) lecture on achieving his childhood dreams. Make time to watch The Last Lecture video if there’s only one video you watch this weekend.

 Anyway, this tip reprises the topic of the very first tip of the week – but this time instead of switching off a pop-up in Outlook, it’s about disabling the “toast” that appears in the top right of the Windows 8 screen to tell you that you’ve got new mail.

In Outlook 2013, go into File | Options | Mail and look under the Message arrival section then un-check the Display a Desktop Alert option.

It’s possible to disable all “toast” notifications in Windows 8, but that’s something of a lumphammer to crack a pine nut. If you want to do it, see here… otherwise, it’s best to control things within individual applications. Within the same menu, you can selectively toggle each app’s notifications setting.

If you’ve configured the Windows 8.1 Mail app to connect to your company email, then you might have the weird experience of seeing an incoming toast from both Outlook (represented as the upper one in the screenshot above, with the fizzog of the sender as represented in the GAL) and within the Win8 Mail app, shown by the different toast below (and possibly a different picture, depending on how the sender is represented in your contacts).

 To disable the toast from the Mail app, go into the app itseld and bring up the Charms (press WindowsKey+C or swipe from the right if you have a touchscreen, or put your mouse in the top right of the screen). Now select the Settings charm, then Accounts, then go into the account you have set up to your corporate emai (since you can set notifications differently per-account).

The “Show email notifications” dropdown allows you to select that you want to allow all email to notify you (bad) or perhaps only to show you mail from your Favourites, as defined in the People app.

Or, of course, to switch off altogether.

Tip o’ the Week #231 – Linking LinkedIn and Outlook, look!

LinkedIn has been going for over 11 years and has resurged in user base and usefulness after seemingly getting really popular initially, and then fading a bit (remember Friends Reunited, anyone? – somebody should come up with FiendsReunited.com, though there are many such strange things already on the internet).

LinkedIn has so many uses if you’re looking for details of someone you’re due to meet – maybe you’ll spot a common interest or people you both know, that can help build rapport during the first meeting. It’s even useful to get an idea of what the person looks like, with only a small proportion of idiots on LinkedIn putting pictures of their baby/dog/car/bike/etc as their profile picture. If only the same could be said of the internally-published Outlook Contact Card pictures…

ToW #192 covered LinkedIn a little but it’s worth revisiting the really slick integration to Outlook, as it’s not enabled by default and since most of the ToW readers will be on LinkedIn, it’s worth setting it up. Especially useful when you get LinkedIn requests from colleagues – maybe a sign that they’re soon-to-be-ex-colleagues, so it’s worth having their details easily to hand should you need to keep in touch with them in future.

When you have the Outlook Social Connector set up with LinkedIn (it’s built into Outlook 2013 so you don’t need to go and download anything – older versions can get it from http://linkedin.com/outlook), then Outlook will  download useful info for you when it recognises someone’s email address on the LI network. Here’s an example before it’s configured – click on the arrow to the right to expand the People Pane for more information. You may even get a notification at this point that LinkedIn is enabled but you need your password to continue.

 Assuming it isn’t enabled yet, the next step is to go into the View tab, look under People Pane and check Account Settings. Tick the LinkedIn box if it’s not already configured, provide your credentials and bingo.

Once you’ve enabled the connector and assuming it’s going to allow download of photos and other info, then Outlook will create a new Contacts group in the People section (CTRL-3, remember?) and it’ll cache elements of your network’s contacts therein.

Without even restarting Outlook, you’ll see the same emails as before will have more details about external recipients – clip_image008just hover over the person’s mugshot and you’ll see their details, and click on the down arrow within the contact summary to view their other information – such as phone number, if they’ve published that in LinkedIn and are allowing their network to see it.

LinkedIn may be the best business social network / recruiting shop window site out there, but don’t hold out much hope for LinkedIn: The Movie.

Tip o’ the Week #227 – Moving around Outlook

clip_image001What’s the most-used application on your PC? Maybe it’s your web browser (IE, of course), but if you’re a corporate email slave like many of us, then it’s quite likely to be Outlook. As you spend so much time in the application, it’s worth getting to know how to move around it a little more efficiently, and that could save you, oh, whole minutes every day.

ToW’s passim have covered the subject in part; see way back to #10 in #119. In summary, there are shortcut keys that everyone should know – CTRL+SHIFT+I will always jump to your Inbox, CTRL+1 will take you to “mail” (whatever folder you were viewing last), CTRL+2 jumps to your calendar, CTRL+3 to Contacts, CTRL+4 to Tasks, etc.

There are a few other tricks you can deploy to help getting about in Outlook with more vim. As well as using the keyboard to jump around, move up and get down, there’s always the bottom of the WunderBar (seriously, it is called the WunderBar – and not just in Outlook). If you click on the ellipsis in the shortcut bar then choose Navigation Options, you can change the order of the items in the bar – so if you like to click on the shortcuts and you use Tasks a clip_image003lot, then you could move that folder up clip_image005the chain so the icon will always be available.

clip_image006(The “Compact Navigation” option hides the text description and replaces the words with a simple icon, and is on by default).

If you remember that you can always get Mail by pressing CTRL+1, then you could ditch the icon from the WunderBar and get it to focus on the other folders you use a little less frequently.

Another trick is that you can fire up Outlook with the view already in a specific folder – as well as right-clicking on a folder and choosing Open in New Window, you can get Outlook to do the same if  you press the Windows Key + R keys and enter outlook /select outlook:foldername where foldername is inbox, calendar, tasks and more. If you put a path to a folder in there – e.g. “outlook:inbox/my subfolder in my inbox”, etc – then it will bring up a new window with the focus in that folder.

Try this:

  • Launch Notepad (press start, type Notepad, enter)
  • Paste the following into the notepad app:

cd C:\Program Files\Microsoft Office 15\root\office15\
outlook /select outlook:inbox
outlook /select outlook:inbox/Not direct to me
clip_image008outlook /select outlook:calendar
outlook /select outlook:tasks

If you think Outlook is installed in a different place, try launching Task Manager (CTRL+SHIFT+ESC) and look for Outlook in the list, then right-click and choose Properties to see the location. Edit the first line of the above list to point to the right place…

The second /select above is to a custom folder that you probably won’t have – try either setting it to another folder you want to jump to, or just remove it altogether.

  • Save the file to the default location (should be your “Documents” folder),  by selecting the Save as Type option to All Files (*.*) then call your file olk.cmd.

Now, if you press Start, type olk and press Enter,  you’ll get a bunch of new windows each pointing to a useful place in your mailbox. 

Tip o’ the Week #223 – Clear your inbox

clip_image002

Some people live a disciplined existence and manage to keep a very tidy desk, their to-do list at the end of each day is empty, and their inbox is clean. Many others aspire to be so organised but either convince themselves that they’re too busy to tidy everything up, or they try hard but just don’t quite manage to make it. History loves a tryer.

Well, this week’s tip covers an awesome add-in to Outlook which could make the difference between finishing your week with a clean slate and a happy mood, or working in the evenings to clear your backlog. What price that peace of mind?

That is a salient question since ClearContext Professional provides some really powerful tools to help get your mailbox and task list under control, but it does cost a reasonable sum to do so. Try it for 30 days, free, first…

clip_image004When you first install the addin, it will set up some new menu options on the MESSAGE tab in the main Outlook Window, and also adds a new ClearContext tab with additional functionality. At a simple level, ClearContext gives you a quick ability to move individual messages and threads to any folder – it will show the last few folders you’ve filed into. If the mail is part of a thread you’ve already done some filing on before then you’ll see the destination for those other messages, and you can start typing the name of a folder to see a list that can quickly be selected from. So much easier than dragging & dropping, expanding out hierarchies etc.

If you’re into the GTD methodology, then ClearContext can help implement that easily given its “project”-oriented view of things. A Dashboard side panel lets you see an overview of your filing, set up auto-filing rules, and a whole lot more.

There’s a very cool Email Stats view that will show you information such as how many emails you send and receive each day, and how long it takes you to respond to them on average.

clip_image005(I’m not going to show you a screen shot as I’m too ashamed of the results – here’s a library picture instead… ->)

How much do YOU think this advanced productivity environment is worth? $500? $1000? Even more??? NO!
Ask BrianV

As mentioned earlier, there is a cost to ClearContext – normally $89.95 for ClearContext Professional, or $99.95 for the “Master Your Now” edition, which comes pre-populated with a bunch of rules to implement another methodology, this time specifically developed for Outlook by Michael Linenberger, called Total Workday Control. Find out more about TWC & MYN here.

Is your effectiveness at work and resulting happiness at home worth £60/$90 of your hard-earned dough?

You can try CC out for 30 days free of charge and decide if you’re willing to part with the readies to keep on top of your mountain of mail. If you decide you’d like to invest, then… ClearContext have kindly offered a $15 discount to loyal Tip o’ the Week readers, here, so you can clear your inbox for only £50/$75 instead. Valid until the end of May 2014. What a bargain!

Tip o’ the Week #214 – Trouble connecting Outlook at home?

clip_image002

If you see Outlook behaving strangely while working at home, there are a few things you might want to try. Symptoms include steadfastly refusing to connect to the server, even though everything else appears to work fine. Or connecting fine for email but hanging when you need to do something “real time” – like look up a meeting room schedule etc.

Regular ToW reader/contributor, Paul “Woody” Woodman, suggests that a series of bizarre connectivity issues are caused by some routers and having UPnP – Universal Plug and Play, a technology intended to make life easier when devices want to talk to each other through a network – enabled.

WoodysGems blog has some more details, and Phil Cross recommends the UPnP toggle as a solution to unreliable Lync and Outlook connectivity. You can always switch it back on again if the problem doesn’t go away…

The way in which Outlook connects to the Exchange Server (where your mailbox lives), is a well-known nest of vipers. clip_image004In the Good Old Days, Outlook and Exchange maintained a direct connection with each other where everything you did on the client was fed up and down the pipe, and all the data resided on the server. Sounds great, but if anything got in the way – like a rubbish network connection, or a somewhat overloaded server – then the whole experience bogged down and got basically pretty unusable.

If you want to see how Outlook connects to the server, find the Outlook icon in your system tray, hold the CTRL key and then right-click on it. This combo displays the hitherto-hidden Connection Status… option. If you’re seeing particularly poor Outlook performance, it’s worth checking this and seeing that everything is connecting OK – try scrolling to the right and look at some of the stats to see if they look out of the ordinary…

Cached Mode salvation

In Outlook 2003, the default behaviour was changed so that Outlook operated in cached mode – in other words, everything you see in your inbox etc, has already been downloaded by Outlook, and is sitting on your PC. So you click on an attachment and it opens immediately, you sort the Inbox with 20,000 items in it, and it’s done in a jiffy.

Cached mode was a Good Thing, and it even helped isolate the user from those slow network links or servers, such that they might never notice – in fact, cached mode was the catalyst for Microsoft IT reducing the number of places where it had Exchange servers deployed internally, from nearly 100 to less than 10. If the server was further away, end users didn’t notice that the network linking Outlook and the server was slow and had a high degree of latency.

Synchronous vs Asynchronous

Synchronous means that both ends are talking to each other as part of the same, real-time conversation – like a phone call. Generally, when on the phone, you’re either listening or talking, and unless you’re one of the many clackety-clack, clickety-click typists and mouseists who inhabit Lync conference calls, you pretty much don’t do anything else whilst you’re deeply engaged. The old way of Outlook <-> Exchange comms was entirely  synchronous. Asynchronous, on the other hand, is more like a text message – you fire it off, and assume that at some stage (whilst you get on with other stuff in the meantime), you’ll get a response.

Well, the Outlook cached mode is an odd mix of both of these – the majority is async, as Outlook is talking to the Exchange Server in the background, bringing down new emails and attachments and the like, but you don’t necessarily know – since most of your interaction is with a local copy of the data, the email won’t plop into your inbox until it’s been downloaded already, meaning it could’ve taken 5 minutes to download and you wouldn’t have noticed.

Where things get interesting is when Outlook has to do synchronous things – such as displaying parts of the address book. If you open the GAL and look at a person’s details, most of the content is coming from a cached copy of the common attributes, however there are a few that are not cached and will only be shown when Outlook has had a chance to have a good ol’ fashioned synchronous chat with the server. Such activities could be looking up someone’s org structure, or what DLs they’re a member of – things you don’t really think twice about when on a fast network but if you’re at home, might be a lot more noticeable.

When you embark on certain synchronous operations in Outlook, the whole application is wont to freeze (with dire Not Responding warnings in the window title) should the network start to go south, or just if the person in question is on the other side of the world and you might be communicating clip_image005with a very remote server.  If you get this far (Not Responding, all Outlook windows go a milky white colour, your cursor changes to the Circle of Hope etc) and start to panic as you haven’t saved that email you’ve been writing for the last half hour, then help may be at hand.  A cure can be to right-click on the Outlook icon in the task bar, and choose Cancel Server Request from the pop up menu. You may need to do several of these in order to truly make Outlook back down, but it often resumes ordinary connectivity to the application, even if the task you asked it to do (which caused the flat spin/heading out to sea moment) didn’t complete.

Tip o’ the Week #212 – Filing and piling of email

clip_image002The topic of filing vs piling of email has been had on ToWs passim (here & here), but this week’s gem comes courtesy of a recommendation by productivity guru Tim Pash.

Tim says he couldn’t live without a cracking utility which plugs into Outlook, called SimplyFile. The premise is very simple – it helps you file your emails in tidy little folders. Whoever has time to manually file all their email, eh? Using keywords it can derive from a message you have selected (combined with previous behaviour), it suggests a folder (or a number of folders) that you might want to file the mail into with a single click.

clip_image004

There are a couple of ways to actually invoke the filing addin – you could select a message and then look to the Outlook toolbar, where the most likely folder is displayed in super-size, you can do some pretty funky filing of entire threads or even all messages within a given folder, where it will prompt you for each one. The tools for selecting folders etc are brilliant, and a model for speedy efficiency.

clip_image006Another option is to just right-click on a mail in a list and use the File In > pop out menu. The software promises to learn as you do more and more filing, but even on the first run it seems to have a fairly decent stab at the right place to put stuff. There are no rules to configure, no wizards to run – remarkably, it seems to just work. You might want to switch off the default filing of everything you send, though – that could be a little annoying.

There are a couple of gotchas – one being that if you have an Archive PST (or a 2nd mailbox into which archive content is dumped) then you might well have multiple folders with the same name (such as the name of a particular client or partner), which could make things a little trickier: SimplyFile might well identify the archive as the place to dump current content instead of the fresh and mostly empty folder that’s still in your Inbox. If you grow to reply on the software, it could be worth coming up with a naming convention for your archive folders to avoid confusion.

clip_image008

Most of us probably have a strategy for arranging folders in Outlook’s hierarchy and giving them names anyway – in fact the two are sometimes linked, with names like zz-Archive that would historically have forced a folder to the bottom of the sorted list, or _ Important that would force it to the top. Did you know that in Outlook 2013, you can manually drag and drop folders around in the tree hierarchy to arrange them in ways other than alphabetically. Quite handy, really…

Oh, the second SimplyFile gotcha – it costs $50 of hard currency but like all the best addictive experiences, it’s available for free for a 30 day trial. Have a go, what’s the worst that can happen?

Tip o’ the Week #198 – 22 minute meetings

clip_image002Hot on the heels of last week’s How 2 rite English proper tip, and the previous extensive Outlook appointment duration code-a-thon, here comes a simple yet entertainingly effective idea to think about whilst you’re digesting all the over-indulgence of the Christmas period (Merry Christmas, by the way) – if you need to meet in person, why not hold shorter, more engaged and more effective meetings?

clip_image003OneNote program manager Nicole Steinbok delivered an award-winning internal Microsoft presentation, blaming inefficient meetings (in part) on the 30-minute blocks that Outlook defaults to.

Apart from the usual stuff like starting on time, having an agenda, etc etc, there are some great bits of advice for having better meetings – some which everyone knows but nobody follows…

· Stay standing up

· Close all laptops

· Silence all phones

One director in MS UK had a Lync status message, “I try not to IM in meetings, preferring to focus on the people in the room – if really urgent please do text me”.

Perhaps not as fundamentalist a stance as the 22 Minute Meeting method, but definitely a step further in the right direction than most people take.

Proud Canadian Nicole also spoke at an external event called Ignite – improving productivity 5 minutes at a time. It’s well worth watching both this and the internal one.

For more info, there’s a Facebook group now, at http://22minutemeeting.info/.