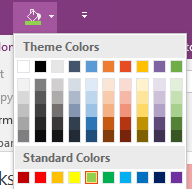
 Most of us will have used the Quick Access Toolbar in Windows Office apps – even if only to click the floppy disk icon to save documents, which, like many others, makes no sense to modern life. The QAT (not to be confused with other, phonetically similar terms) lets you dock commonly-used commands to be constantly available on the top corner of your favourite Office apps. Most of us will have used the Quick Access Toolbar in Windows Office apps – even if only to click the floppy disk icon to save documents, which, like many others, makes no sense to modern life. The QAT (not to be confused with other, phonetically similar terms) lets you dock commonly-used commands to be constantly available on the top corner of your favourite Office apps.
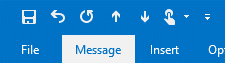 Click the downward arrow to the right of the QAT and you can quickly add extra commands, either chosen from a common list or by selecting pretty much any command from the gamut of menus offered in the Office application. Click the downward arrow to the right of the QAT and you can quickly add extra commands, either chosen from a common list or by selecting pretty much any command from the gamut of menus offered in the Office application.
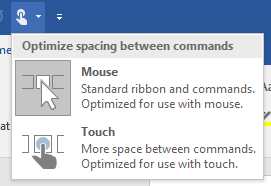 A common QAT command is the Touch/Mouse mode option that changes the spacing between menu items and the like, but there are many other useful commands that can quickly be added to the toolbar, that make it easy to do repetitive stuff or just things that are normally buried deeply in other menus. Let’s try a couple of examples. A common QAT command is the Touch/Mouse mode option that changes the spacing between menu items and the like, but there are many other useful commands that can quickly be added to the toolbar, that make it easy to do repetitive stuff or just things that are normally buried deeply in other menus. Let’s try a couple of examples.
In Outlook, try opening a message that someone else sent you (this one would be a good start); go to the QAT and click 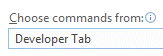 the down arrow to the far right side, choose More Commands… and then select “Developer Tab” from the Choose commands option. Now, pick the Design this Form option from the list and Add to the the down arrow to the far right side, choose More Commands… and then select “Developer Tab” from the Choose commands option. Now, pick the Design this Form option from the list and Add to the  toolbar. Then press OK. toolbar. Then press OK.
This will now add a new icon to the QAT, which will let you “design” whichever form you have open. In Outlook, a “form” is used to display 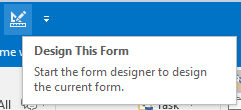 Items such as email messages, contacts, calendar appointments etc. The QAT is content-sensitive to different forms, so if you add it to email, it won’t show up on appointments unless you add it there too. Items such as email messages, contacts, calendar appointments etc. The QAT is content-sensitive to different forms, so if you add it to email, it won’t show up on appointments unless you add it there too.
In fact, adding to appointments is the best place to do it, since you can show the date and time that an appointment was created in your calendar; if you just find an appointment that you can’t remember the context of, you could quickly show the date/time you created it and that might help figure out how valid it is. If you have a meeting that someone invited you to, you’ll easily see the date/time it was sent, but if you’re the organiser, you won’t – unless you use something like Design This Form, then navigate to All Fields and choose Date/Time fields to show all the common date or time attributes of that form.
For more context, this topic was covered some time ago on the Electric Wand blog and a previous tip, #102.
 Another example of QAT goodness is in OneNote – if you’re routinely using OneNote for account planning or Another example of QAT goodness is in OneNote – if you’re routinely using OneNote for account planning or 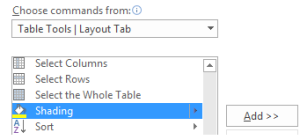 status reporting, it’s quite handy to be able to colour cells or rows in tables to show their status, but the menu option to set the colour would need you to go into the table menu. To quickly add to the QAT for future easy access, click the down arrow / More Commands… / choose the Table Tools tab and look for Shading, then Add>> and OK. status reporting, it’s quite handy to be able to colour cells or rows in tables to show their status, but the menu option to set the colour would need you to go into the table menu. To quickly add to the QAT for future easy access, click the down arrow / More Commands… / choose the Table Tools tab and look for Shading, then Add>> and OK.
Whilst you’re playing with any application’s QAT, it’s worth having a look through the other commands you might want to add – like while still in OneNote, try your favourite OneTastic macros, for example.
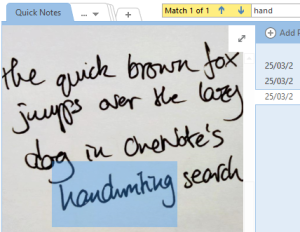 On the topic of OneNote (and we’re still talking about the desktop one, not the Modern App version), there have been some updates shipped out to Office365 users that could be interesting – especially the ability to search handwriting, not just scribbled using a Surface stylus or similar, but grabbed from a photo by OfficeLens. There’s a promise of a future update that will be able to search handwriting in any picture that’s dropped into OneNote. On the topic of OneNote (and we’re still talking about the desktop one, not the Modern App version), there have been some updates shipped out to Office365 users that could be interesting – especially the ability to search handwriting, not just scribbled using a Surface stylus or similar, but grabbed from a photo by OfficeLens. There’s a promise of a future update that will be able to search handwriting in any picture that’s dropped into OneNote.
This opens the door to being able to scan in old paper notebooks for easier reference/shelf space clearance, and ditch the dead tree notebooks for digital. If you’re like controversial car design Chris Bangle, you may beg to differ.
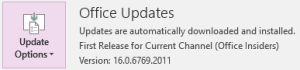 To check you’re on the latest version of OneNote via O365, go to the File menu, look under Office Account and the Office Updates section, and choose Update Now from under Update Options. To check you’re on the latest version of OneNote via O365, go to the File menu, look under Office Account and the Office Updates section, and choose Update Now from under Update Options.
|


