|
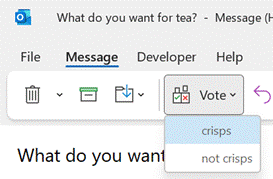
Recipients get prompted in Outlook and can vote with a single click, rather than having to type a response, and the sender can see a Tracking One downside of voting buttons, though, is that they only work in Outlook – there’s no Web App or mobile support, so it does restrict the usability somewhat. Great news, though – a more modern approach is available; not only does it work using the Outlook mobile apps and the browser but it’s a bit more in-your-face for most Outlook users too, with a simple and quick way of responding.
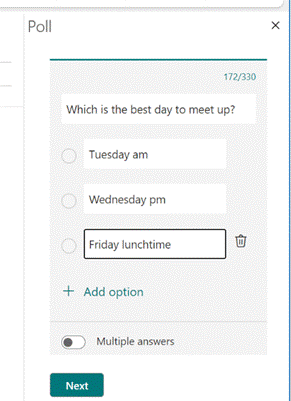
Clicking on the icon gives you a single question with two or more options; it’s powered by Microsoft Forms, but there’s no fancy branching or data validation – it’s a straight “choose one of these short text responses” feature and all the better for it.
Since it’s delivered as part of a Microsoft 365 / Office 365 subscription, it’s a little less slick when dealing with users outside of the organization / tenant (the inline previews don’t show up, so outsiders will need to click the link and use the web UI, and will need to type their email address into the response too), so think of it as a friendly and visible way of collecting simple internal votes. |
Category: Outlook
594 – One day, meetings != Teams
|
When you create an appointment in Outlook and decide to turn it into a Teams meeting by clicking the icon on the Then there’s the text that gets added to the end of any existing appointment text, which gives dial-in info and provides a link for users who like to click on URLs or who are running a calendaring client which doesn’t support Teams natively. Some degree of customization can be done to this auto-text, but it’s an admin task rather than an end-user one.
The option is accessed from the main Outlook window, under File | Options | Calendar, and is just above the groovy feature which lets you choose to shorten the default meeting time, so as to allow you and the attendees to get out of your chair once or twice in a working day. From the ToW history files: When you create a thing in your calendar that’s just for you, that’s an Appointment. When you start to invite other people to your thing, then it becomes a Meeting. The Outlook UI changes when you’re dealing with Meetings vs Appointments (e.g., see tracking information on who accepted your meeting invitation, etc). When the Teams integration to Outlook was first rolled out, the workflow to create a meeting was typically to put the time in your diary, invite your desired attendees, then click the Teams Meeting button to add all the extra stuff that anoints the meeting to become a Teams one. That was a one-way process, though – if you clicked in error or decided to forego the online element, you either had to hack out the properties and text (since merely removing the “join” links in the text didn’t get rid of the Join Meeting UI in Outlook, as that was lit up by the contents of the various custom fields in the item) or, more likely, ditch the meeting and create a new one.
The bypass feature is meeting-specific, so if you are scheduling 1:1s with customers or partners, you might want to let the striaght through, but if hosting a larger meeting then having a lobby could let you get your internal team straight before bringing in your guests. |
579 – Archive that email
|
There are tools – some mythical and magical – to reduce volumes of unnecessary emails, and automatic processing via features like the Focused Inbox or Clutter can help to filter out stuff that is getting in the way, but fundamentally the decision on whether to delete, defer, delegate or just leave it lying about, rests with the user. There is still an AutoArchive function in Outlook, but you probably don’t want to use that.
If the Archive option shows up in the web UI (with suitable icon), the folder should also be visible in desktop Outlook in the main folder tree. Just like you have an Inbox, Drafts, Sent Items Check out the Archive folder properties, and you can see its size on your own machine or on the server (assuming that you’re not storing everything in your mailbox within your Outlook cache). To fire an email into the Archive folder from the desktop Outlook client, just press backspace if you’re currently viewing the message in the preview window. The default shortcut key to archive a message in Outlook Web App is E though you can reconfigure the app to use different shortcut schemes, in case you’re more familiar with other web clients. To see the shortcuts in Outlook web app at any time, just press the ? key. |
575 – Who’s meeting?
 Organising a meeting in Outlook means sending out requests to participate – effectively you’re creating an appointment or event in your own calendar, then converting into a meeting by inviting other people to join you. If you’re putting something in your diary and want other people to know about it, but without expecting them to join you (eg you’re going on vacation and presumably don’t want your teammates to tag along), simple tricks can reduce the annoyance you might foist onto your co-workers… Organising a meeting in Outlook means sending out requests to participate – effectively you’re creating an appointment or event in your own calendar, then converting into a meeting by inviting other people to join you. If you’re putting something in your diary and want other people to know about it, but without expecting them to join you (eg you’re going on vacation and presumably don’t want your teammates to tag along), simple tricks can reduce the annoyance you might foist onto your co-workers…
Who has responded? Have most people declined?
If you are organising or attending a large business meeting with lots of attendees, it’s useful to be able to slice and dice the attendees more effectively – have most people declined and should I move the date, for example – click on the big Copy Status option at the top of the list.
If you right-click the table and select Table > Totals Row then if you filter the headings – like the responses, for example, you’ll be able to quickly see how many Accepted, Declined and so on. What could be interesting, too, is showing attendees names alongside their role, department, which office they’re from, their actual email address etc… Well, thanks to the magic of macros, use this Address Book Resolver spreadsheet, and just paste the responses from the Copy Status… step into cell A1, then hit the Resolve button. Some attendees might be external users (so won’t be known to your address book), and some of the names in the first column might not be unique enough to resolve, and will be highlighted (alongside external users) by a red Unknown in the Job Title column.
To use this sheet for resolving any list of bulk display names or alias names, just paste them into column A (and hide Columns B and C if you’re not using the output from a meeting invite tracking list). To prepare the spreadsheet for use, download the Address Book Resolver file as above (here it is again). Open the ZIP file and open the enclosed XLSM file or save it somewhere on your machine, then open it. Make sure you Enable Editing, then Enable Content so you can run the Macro that does the lookups. This is an evolution of the Alias resolver sheet posted back in ToW 417. |
573 – Searching in Outlook
|
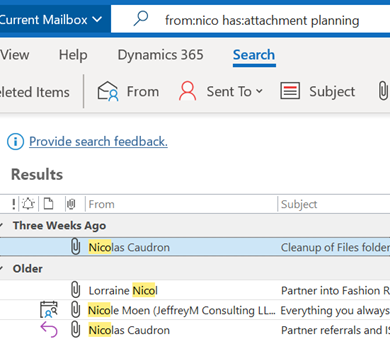
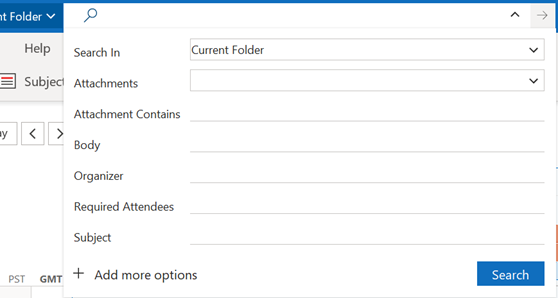
Or has:attachment, which will only show you mails that have other files attached. Combined with a few other criteria, you can filter the results of your search pretty hard, rather than sifting through them. Adding some other smarts like received:”last month” can streamline some more. For more info on search terms, see here. The scenarios our reader posed, though, were specifically around searching in the calendar – eg, do I have a meeting in my calendar with a particular person? Or what recurring appointments are due to expire this month? If you navigate to your Calendar and click the down-pointing arrow to the right of the Search box, it will display a Click + Add more options to bring up a picker that lets you add even more – such as whether the meeting is a recurring one, or if it shows in calendar as Busy or not. Selecting the options builds the query as before, so you can see a variety of defined names – like organizer | organiser (depending on your locale) or requiredattendee:. Coming back to the original question; if you want to find all future meetings in your calendar with anyone called Tony, you could type something like requiredattendee:tony start:>today. And if you want to find out which
Don’t be alarmed if some of them are due to keep happening until a very long way into the future. We’ll probably have stopped using email by then. History Lesson Before Outlook arrived as part of Office 97, users of Exchange Server had an email client and a separate calendar app (Schedule+; that’s why some diehards still say things like “send me an S+”, meaning send a meeting request). Both would maintain a connection to the server and would chat back and forth, only downloading data when a message or attachment was opened. Although this put something of a penalty on the network, it meant there was no need to cache large amounts of data on a PC hard disk. Outlook replaced both the mail and S+ clients, but maintained the same synchronous connection to the server. Outlook 2003 and Exchange 2003 changed the default model, since PC hard disks were getting much bigger and cheaper, so it made sense to have Outlook deal primarily with a cached copy of the user’s mailbox, bringing all kinds of performance benefits to both end user and to the operators of the server back-end. One really notable improvement was the ability to run fast searches against mailbox data that’s in the cache, rather than having to execute searches on the server. Prior to the cached mode, the best-case scenario for running a search was the server returned messages that fit a particular query asked by the client – mails received this week, mails with FOO in the subject line etc. If the server had indexed the relevant properties (received date, subject etc), it was pretty quick at sending back the results. If the user wanted something more in-depth, it was a punishingly slow process as each message would need to be picked up and inspected to see if it met the query – so searching for every email with a particular word in the message body text would be laborious. Three cheers for cached mode and client-side indexing.
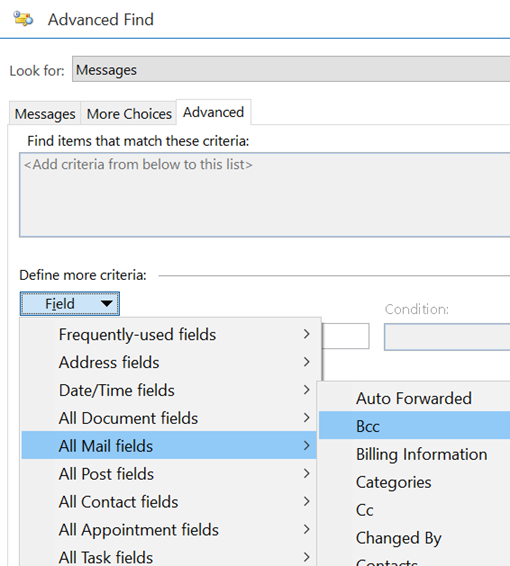
The first couple of tabs on the Advanced Find dialog let you search for mailbox items that fit some common criteria – but the third tab is a window into how Exchange stores and categorises messages, appointments, tasks etc.
Aside: most apps use CTRL+F to invoke Find – try it in Word, Excel etc – but in the mail client, CTRL+F forwards a message instead. Find out why, here. The idea here is that you can build a query based on properties of messages – and when you select the Field from the extensive drop-down list, it would let you choose appropriate filters (some, like Flag Status or Receipt Requested would only have a couple of possible values, but others would let the user enter text, date or numeric filters). Not all of the fields are used for much these days – eg InfoPath Form Type harks back to the days when the now-defunct InfoPath could be used to create mailable forms – but having a poke around in Advanced Find can give a curious user some insight into how Exchange and Outlook organises their data. |
#571 – Save the Daylight
|
If the country or state you’re in observes summer time, then you’re either about to enter (if in the northern half of the marble) or leave it (if southern). To keep us on our toes, this movement back or forth often happens around the world on different dates. To keep us on our toes, some countries have less-than-hour gaps between time zones, and in the past, others have decided to change time zone permanently.
– eg if it’s 2:30am in Iran, then lining Tehran up with the red hand would put both London and Paris at midnight, since they’re both at GMT+1. eh? In October 1968, the UK decided to move to British Standard Time – GMT+1 – all year round. This particular wristwatch was produced between 1968 and the end of 1971, when the practice was reversed – so for a while, it was correct that London would be in the same time zone as Paris and Rome. Except the watch wouldn’t know when Paris and Rome went into summer time, thus putting them an hour further ahead… oh well, never mind. In a global working environment, especially one where everything is done online rather than having people in the same location, the friction of time zones changing has never been more obvious. Usually, you’ll only move through time zones relative to everyone else when you travel – flying across large distances, or maybe just driving across a bridge or dam. But now, a digitally-oriented meeting can shift its time for some of its attendees, relative to the others – depending on where the originator is based.
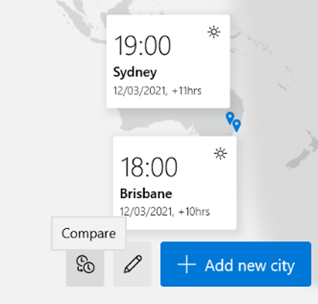
Those parts of the US which observe DST, are due to move an hour forward this coming Sunday (ie March 14th). In common with doing things differently to everywhere else, that brings the US (and Canada) one hour nearer most of Europe for the next two weeks, until the end of March. Much of the southern hemisphere comes out of DST the week after that, so by then Sydney will be two hours nearer London than currently. The impact of this can be seen in peoples’ calendars, when regular meetings somewhat inexplicably start to clash with each other – if a UK organiser set a recurring meeting for 4pm GMT, that would normally compel Seattleites to be there at 8am, but since they’ll be only 7 hours behind for a couple of weeks, that shifts to 9am in their calendar, potentially clashing with some existing 9am Pacific Daylight Time meeting. Conversely, a 9am PST / 5pm GMT meeting as created by the person in the US a few weeks ago, would now start at 4pm in the afternoon in London. Great news if that meeting is a Friday afternoon, as it brings beer o’clock one hour forward. Although Outlook does a pretty decent job of juggling the differences between time zones, there is no obvious way to show what time zone a meeting had been created in (eg show me all meetings that are going to be affected by this shift for the next 2 weeks). A simple trick if you want to check on a specific meeting, is to start a Reply to a meeting you’ve been invited to, whereupon you’ll see the time zone of its creator…
While It won’t help you identify the meetings that are causing the clashes, it might help restrain you from firing angry missives at the organiser of the meeting, if you know what’s causing it. |
564 – Do Mention It
|
The same behaviour is commonly available in Teams as well, though it may be more limited as to who you can mention – in the chat for a meeting or in a Teams channel, you’ll typically only be able to @mention the people who are taking part or who are already members of the team. Like other uses of the @mention idiom, tagging someone will insert their full Display Name, as defined in the Microsoft 365 environment (or the address book if you like) – which can make mentioning people in a chat feel a little directorial or formal, especially if the format of their display name is something like FamilyName, GivenName (DEPARTMENT).
In most uses of the mention, you can edit the full name of the person, though it’s not quite consistent how to do it – in Teams, for example, merely pressing backspace (after the display name has been resolved) will remove the last word … so if you want to tag a colleague and their display name is Jane Doh, then a quick tap will reduce that to simply Jane. If they were Doh, Jane (IT) then it’s a little more complex to lose the formality – holding CTRL+SHIFT while pressing the left arrow will select a word at a time, so you could ditch the last part of the name then simply CTRL+Left arrow would skip the middle part, then CTRL+SHIFT+Left arrow/Delete will remove the first part again. Lesser platforms might allow a user to set a nickname that is used in place of their display name; that’s not (yet) an option in Teams etc, though in Outlook when you mention someone, you could insert a nickname in-between other names then remove the original ones, leaving only the short name you’ve added, but still hot-linked to their contact card etc. It’s a bit clumsy but might be preferable to calling them by their more formal name.
Just click the sort/filter option found to the top right of your Inbox or other folder, and choose Mentioned Mail to show only messages where you are mentioned. As with all such features, it works for some people and work cultures/environments better than others. For some external best practice guidance, see here or here. |
563 – Remove the Dupes
|
As storage got cheaper, the tendency to just keep old data gained prevalence, though some systems imposed limits due to the relative complexity and expense of managing their data, providing resiliency and backup services.
When Google launched Gmail in 2004 with a staggering mailbox limit of 1GB – 500 times that which was offered by Hotmail – the rules on what was expected for email quotas were re-written, with an expectation that you would never need to delete anything, and could use search to find content within. Leaving aside corporate policy on data retention, keeping piles of stuff indefinitely causes its own set of problems. How do you know which is the right version? Can you be sure that you have copies of everything you might need, in case the data is lost or damaged? If you have a backup, do you know that it’s a full copy of everything, and not a partial archive? Having multiple copies of the same content can be a headache too, if you’re not sure which is the true original and which might be later copies or partial backups. Applications might create their own duplicate content – perhaps through bugs, or through user activity. There was a time when syncing content to your phone or to another machine might risk duplication of everything – like having multiple copies of contacts in Outlook, for example. A variety of hacky resource kit utilities were created to help clean up mailboxes of duplicate contacts, appointments etc; you might want to check out a more modern variant if you’re worried that your mailbox is cluttered up.
Cleaning up the dupes can help make sense of what remains. You could spend money on proper photo archiving and management tools like Adobe Lightroom, or you could roll your own methodology using a mixture of free and low-cost tools – tech pundit Paul Thurrott recently wrote about his approach. There are many duplicate-removing tools out there – just be sure you’re getting them from a reliable place, free from adware and other nasties. Be wary of anything that purports to “clean” your PC (registry cleaners etc), watch out when accepting T&Cs and don’t allow the setup routine to install any other guff you don’t need. Make sure you have the right protection on your machine, too. One recommended tool is Duplicate Sweeper – free to try but a princely £15 to buy, but worth the peace of mind that comes with a tidy photo library or Documents folder. |
558 – Sharing your holidays
|
Really progressive people might even be sharing their calendar details with you, so you can see what they’re doing – useful, as all-day busy events obliterate everything else if details are not shown. If you’d like to tell other people you’re going on holiday, then you should create a 2nd appointment and invite your colleagues to it; but there are 3 important steps to take when you do this so you don’t muck up their calendar and annoy them to boot. When creating your second “FYI” holiday appointment:
While we’re setting the appointment up, it’s OK to not use Recurrence too – some people think that the way to make a multi-day appointment is to set a one-day meeting that recurs every day for a week. Don’t do that. Just set the start and finish Now all you need to do is create a suitably informative and entertaining Out of Office message and you’re all set! |
555 – checking Accessibility
|
These technologies often spawn wider usage in unforeseen ways, and in many cases are developed not for goals of making a fortune or having global influence, but to help a particular individual:
Microsoft has a long history in pushing accessibility technology – Windows 95 was the first You can jump straight to many of the settings applets by running ms-settings:easeofaccess-keyboard or ms-settings:easeofaccess-speechrecognition and so on.
The Check Accessibility option on the Review tab in Office apps like Word and Outlook, should be run just as you’d check the spelling of a document when you think it’s finished. The tool will give you a series of recommendations with guidance as to why it may be better to change aspects of the document. Not every one will be viable – you may want to have images in a particular place on the page, for example, rather than just in-line with text – but many are quick to correct.
One call to action would be update your own sig to add Alt Text, or to mark the images as decorative so screen reader software ignores them. For more tips on how to write documents which are more accessible, see guidance from Microsoft or from the University of Washington. Some resources for developers or web page designers from the UK Gov, with plenty of links to other sources – Testing for accessibility – Service Manual – GOV.UK (www.gov.uk). |


