|
Back in the OCS days, it was assumed you had a server on-premises (style note – the opposite of “in the cloud” is “on-premises”, ie in or on the premises you have, possibly abbreviated to “on-prem”. It is definitely not, ever, “on-premise”. If you are on-premise, that means you’re in agreement with a point of view, not that you still run your own datacent(re|er)…), not an assumption that you’d make today, with flexible working and Wi-Fi everywhere.
Anyway, as well as having on-prem kit that’s quite possibly connected to a physical phone system, Lync/S4B largely assumed your client (wired to a LAN) connected to a local server. That communicated to other clients and servers in the same environment (mostly) and, maybe via a gateway, to the outside world for the POTS. How cool it was to click a link in the communicator client, and next thing your desk phone was calling that number! As Teams imminently starts to replace Skype for Office 365 customers, we’re seeing lots of best practice guides and other resources for successful adoption. Further Teams ToWs will follow as well – in fact, if you have one you’d like to share, please write it up and send it over. This week’s tip focuses – or rather doesn’t – on a very cool trick when using Teams for video calling: the ability to blur your background, so as to remove distractions for other parties in the call. There’s a great short video ad illustrating the feature, here. See it in action here.
Blur background was made generally available to coincide with Ignite – as were a bunch of other updates. |
Tag: Skype for business


Tip o’ the Week 392 – distract with GIFs
|
One long-used file type goes back to 1987, the GIF – standing for Graphics Interchange Format, predating the eventually prevalent JPEG format by 5 years. GIFs were relatively poor quality – only 256 colours could be used; 30 years ago, that wasn’t an issue but in recent decades, it’s more limiting. Most people, however, will be familiar with GIFs due to a sub-variant – the Animated GIF. This is a series of frames which are played like a simple video – with low frame rates & no sound, yet they have occupied a niche in the way people use the web.
Adding animated GIFs to chat applications is a good way of making a
Facebook has the same kind of thing on comments boxes, from a variety of s Finally, Outlook.com has unveiled a new beta mode that is available for some users (& rolling out to more – look for a “Try the beta” toggle switch on the top of your Hotmail/MSN/Outlook.com mailbox) – and one feature will be animations that can be easily embedded in mail.
Read what Thurrot has to say about the other bits of the beta. |


Tip o’ the Week 391 – Smile, control your emoticons
 “Smileys” have been around in one form or another for a surprisingly long time. The use of the original 🙂 smiley goes back 35 years, but written symbolism to convey emotion goes back to the 17th century, maybe even in the days of Lincoln. “Smileys” have been around in one form or another for a surprisingly long time. The use of the original 🙂 smiley goes back 35 years, but written symbolism to convey emotion goes back to the 17th century, maybe even in the days of Lincoln.
In modern times, the smiley has evolved; after the grinning yellow dot being used in various waves of popular culture, the textual facial-expression-on-its-side became more common as people flocked online and started using email and instant messaging. Gradually, icons of a variety of smileys helped convey a wider range of meaning – becoming known collectively by the portmanteau, “emoticons”. Or the Japanese-based variant, emoji. If you’re bored sticking pins in your eyes, you could be watching a Turkey at the flicks, though you’re more likely just an end-user of the emoji symbols. Over recent years, emoji have become more mainstream and therefore the interpretation of symbols across different platforms has grown in importance – if you enter 🙂 into many apps, you’ll get a – as configured in the AutoCorrect function in Office, and natively supported in lots of other applications, and if you send a text message with emoji in it, you’d hope that it gets interpreted correctly at the other end.
If you’re using Skype (consumer, and Skype for Business), though, there’s a shortcut for each emoticon, that you can type to insert the relevant symbol – eg. (t) or (call) will insert Other handy shortcuts for Skype for Business include (b), (d), (y), (n), (cic), (!), (e), (run), (k) – careful, mind… Why not try them out on your colleagues next time you’re IMing? The consumer Skype app has lots more emoji/emoticons than the Business version, as you might expect – generally speaking, there’s not a lot of business need for 💩 or dancing gran icons. Well, unless you know differently? ✋ |
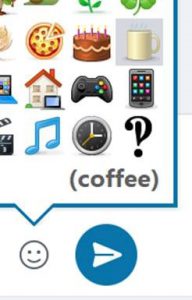 To insert emojis into your mail, IM or whatever, you could type the foundation characters – like 🙁 or 😀 – or copy & paste the relevant symbol from a source such as
  the symbol to the left, or (c) or (coffee) will show the cup symbol. Just hover over the symbol and you’ll see the shortcut you can type.
Tip o’ the Week 352 – Skype for Business Custom Presence
|
Many years back, OCS added the capability to present different custom states too – but it’s always been a bit of a faff to achieve consistently. Skype for Business doesn’t make it a great deal easier, but thanks to a few enterprising types, it is still possible to enable without too much trouble. Custom presence allows users to have up to 4 custom status fields defined, in the status of Online, Busy or Do Not Disturb, which can be used to show even more context – like I’m in a meeting but can IM, or I’m busy presenting with customers so don’t disturb. There are a couple of ways to achieve said nirvana…
The downside is that the Presence Tool starts with 4 blank presence states, so you can’t easily modify what you have already – and setting 4 empty entries will clear all custom presence from the client. Also, it only lets you choose online or busy as the available status. A more complex but more comprehensive approach would be to use a technique developed by MVP Ståle Hansen, to use a PowerShell script to create the config file which sets presence states. It’s relatively straightforward if you follow these steps:
The benefit of using this script rather than manually configuring everything is that it can be easily shared with others, or just re-run across multiple PCs so you have a consistent set of presence options. Now look at your friends in Skype for Business to see who has the most creative custom state …
NB: If the above doesn’t work (and you’ve checked the registry entry points to a correctly-formatted XML file etc etc) then it may be a policy on the server that’s preventing it. One possible solution would be to host the XML file on a suitable web site that lets you reference it directly using https:// and point to that in the registry instead. |


Tip o’ the Week 326 – Skype for Business, meet Skype consumer
|
Put simply, Skype for Business has the ability to communicate with users on the consumer Skype platform, as well as to federate with other parties, and Office365 has it enabled by default. This means you can exchange IMs and see presence for Skype for Business users outside your organisation.
Now, if you’re not federated (or
An even easier way is just to start typing the person’s name, Skype ID or Microsoft account, into the “Find someone…” search box within Skype for Business and click the Skype Directory button: you might well see them listed, profile pic & all – right-click on their profile to add them as a contact (which will kick off a contact request just like in consumer Skype). Once someone has been added from consumer Skype to your contact list, you can IM them, see their presence, and even fire up an audio or video call with them, without needing to use the consumer Skype client yourself. Nice if you’d prefer to keep your business contacts and your personal ones separate, but if your customer is asking to have a Skype chat with you… You can try this out by running both Skype and Skype for Business side-by-side and adding your contact, sending yourself a test IM, even cracking open a video or audio call.
Options are to ask the Skype user to join using the Skype for Business Web App, or use the consumer Skype client to call the phone number the Skype for Business meeting offers to regular phone users. For more details on how to set up and use Skype for Business federation, see here. Check this post for instructions about getting it working with consumer Skype (or here). And another. |


Tip o’ the Week 307 – Skype Meeting Broadcasting
 It’s been a busy time for the Skype team at Microsoft. At the Convergence EMEA conference, it was recently announced that Office365 had a new SKU: Office365 Enterprise E5.
There are a few headline new things in the E5 package – but for Skype users, maybe the most significant are the Cloud PBX and PSTN Calling capabilities; these basically allow smaller businesses to use Office365 as their phone system, by using an on-premises gateway or eventually by having a cloud-provided service that functions as the phone system (the Private Branch eXchange). Here’s a pretty useful summaries of what’s new.
 The E1, E3 and E5 SKUs all get a new Skype for Business capability which enables users to do online meetings with up to 10,000 participants: Skype Meeting Broadcast.
You can produce and broadcast online events live to thousands of participants, using a high quality video stream to any device running any operating system without the need for plugins or downloads. It can be used for internal All Hands meetings, as well as streaming broadcast events to external customers.
Other points of interest include:
- Participants can join from anywhere, on any device; all they need is an internet connection and the link to the broadcast. Event organisers can restrict entry to only a named list, anyone from your company, or anyone who has the join link. Skype Meeting Broadcast is supported to accommodate up to 10,000 ‘live’ attendees.
- If get delayed and miss the beginning of a meeting: no problem. Simply join the broadcast and rewind to start watching the event from the beginning. You can also take a break without missing a beat by pausing and restarting when you’re ready.
- Skype Meeting Broadcast limits the real-time audio and video to presenters only, but your audience can join ‘live’ conversations using plugins like a Yammer feed and a Question Answer Manager or provide real-time feedback using Bing Pulse. So, no heavy breathing / dog barking / furious typing from the attendees to distract each other.
- With familiar Skype controls, it’s easy to switch between video and content and spotlight presenters like a professional producer. Once the event is over, you can publish the recording to your preferred location, plus pull in-depth event metrics and create insightful reporting.
To learn more about Skype Meeting Broadcast, check out the Office.com site
Tip o’ the Week #278 – Skype for Business UI tips
 Skype for Business has rolled out across a good number of customers and it’s, generally-speaking, a great UI update compared to Lync. The clients’ histories were covered a few weeks ago, if you’re interested…
But there are a few differences that could catch people out. If you join a conference call, for example, it’s possible you won’t see the list of attendees, where with the old Lync client, you’d be able to quickly show them with a click of the chunky Participants button  in the Lync meeting UI. In Skype for Business, during an IM chat or call, you’ll see there’s no equivalent participant button – there’
 s the usual button to show the IM window, which shows the text chat section but not the participants button.
 This has been moved to higher up in the UI – it varies depending on which kind of chat/meeting/conference you’re in. Click on the icon to the left of
  the text (hover and you’ll see the Open Participant List tooptip) and you’ll be able to view that list.
On a simple IM conversation, the same thing is true, too, only with a smaller button.


If you look in the Settings | Tools | Options page within the Skype for Business client, under the Skype Meetings setting, you can set the default on what happens when you join a meeting.
There are some other tweaks too, such as using the view icon on the top right of the meeting window – Galler y View shows you a horizontally-arranged list of attendees’ mugshots, which can be right-clicked to interact with them. Speaker View hides
  all of that, but still shows a picture of you next to the person who’s currently speaking, and Content View hides both in favour of the presentation content that’s being shown (the “Stage”).