
|
Legitimate examples might include things like downloading a company logo from its website so you can include it in a PowerPoint slide; try going to just about any major company site and you’ll probably find it’s not straightforward to save the image file. Ditto all sorts of clever pages that might stop you simply saving the picture to your PC.
If you want to grab the actual URL for an image on a web page, the The Inspect Element funciton in browsers is designed to help web page debugging; it’ll let a user or designer jump straight to the section of a web page’s source, and inspect or even modify the code behind the page.
Look for the src= part, double-click on it and you’ll see the URL of the image in an editable text box, meaning you can easily copy that to the clipboard and get ready to paste it wherever you need it
Using a search engine Of course, there may be easier ways to get an image – using Bing or Google search, for example. Bing is actually quite a bit better in this regard. When you click on an image in the results from Bing’s Image search, you’ll see a larger preview of the picture along with a few actions you can take – like jump to the originating page; search for other sizes of the same image; use Visual Search to run a query on just some selectable portion of the image; or simply just view it in the browser, thereby opening just that image and showing you the direct URL to it. In the case of both Google and Bing, if you click on “Share”, then you’ll get a link to the search result of that image rather than the picture itself – so if your plan is to embed the image in another web page or upload it to some other place, then you’ll be frustrated.
Simply choose Upload picture, paste in the URL of the logo you want to use and you’re off to the races. Figuratively speaking, anyway. You might have to jigger about with the proportions of the image by downloading it first and editing it elsewhere, as the image will need to be more-or-less square. Built-in icons in Teams appear to be 240×240 pixels in size so you could try to target that if you’re resizing. |


Tip o’ the Week 457 – Clipboard improvements
 Windows 10’s latest update – the October 2018 Update – has now started rolling out again, after a series of issues reported by some users about data going missing. Here’s how to get it if you don’t have it already and don’t want to wait until it trundles along via Windows Update. One of the neat new features is a revamped clipboard – something that has been tried a few times before, supporting additional features like keeping a history of what you clip, and/or allowing clips to roam across different machines. This has at times been achieved in standalone apps (eg via The Garage), or through individual apps managing the process – did you know, for example, that Office had a clipboard that supported
In Windows 10 with the October 2018 update (version 1809: to check your version, press WindowsKey+R then enter winver), there’s a new paradigm for managing the clipboard right across Windows applications – and it harks back to the old CTRL-V key combo that is more than 50 years old itself… from ToW #133 (from mid-2012): CTRL-V goes back a loooong way. Its first use was years ago in the “Quick Editor” – aka QED – co-developed by Butler Lampson, one of the giants of computer history, now employed as a “Technical Fellow” in Microsoft Research.
|
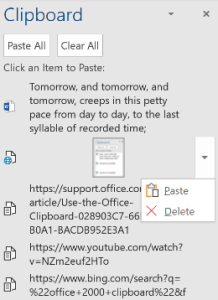
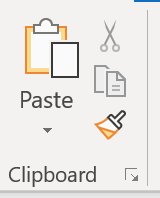 And it’s
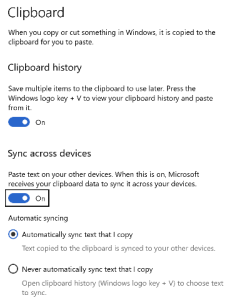
 mechanism is an opt-in arrangement, where you can carry on using the one-hit clipboard as normal, or you can enable history or even cross-device Syncing to allow multiple machines to get the same history, just like browsing history, Timeline etc can roam across different machines if you wish.
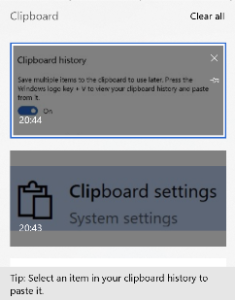 To access the new Clipboard UI, press WindowsKey+V. There isn’t much obvious control over the experience (other than enabling it via Settings).
Tip o’ the Week 456 – Alexa on PC
|
Amazon meanwhile has brought the Alexa app to the PC, not just on select new machines but for everyone running the latest release of Windows 10. See here to install. This gives you the option of talking to your PC to control the plethora of 3rd party devices that support the Alexa ecosystem, as well as all the other stupid stuff you might ask of Alexa already. Find out more, here. |

Tip o’ the Week 455 – Pin your PMAs
|
Microsoft published a bunch of 3rd party PWA apps directly into the Microsoft Store (eg start with SkyScanner then click on “Microsoft Store” when opened with the Store app itself rather than the web UI), though there haven’t been any new ones for a while. Google is also throwing its weight behind PWAs – so much so, that version 70 of the Chrome browser has support for PWAs that can be installed to look like a desktop app on Windows, so when the PWA is running it hides the browser UI and is launched from either within Chrome directly, or from the traditional Windows app UI.
To look for dedicated PWA resources, check out this list, or look here, here or here. |


Tip o’ the Week 454 – Time Zone Tumult Ahead
|
Many Southern Hemisphere nations have already moved into “summer time”, though a few will make the transition on 4th November. Europe, most of Mexico and parts of the Middle East will move out of DST this weekend, but most of the North America and the Caribbean will “fall back” the week after. See the list of places that currently observes DST and when they transition. This can play havoc with people’s electronic calendars; systems these days generally take notice of time zone changes pretty well and that means the relative times of meetings are preserved, though what this does mean is that a 9am meeting organised in Seattle (and therefore hosted in Pacific Time) will be 5pm for attendees in London this week, but it would be 4pm GMT the week after, then back to 5pm after that, as the US moves clocks back. This topic was covered 3 years ago in ToW #301, and most of the tips contained therein are still valid today. Maybe future generations will stop the winter/summer time flip-flop effect altogether (Californians get to vote on whether to join their neighbours in Arizona, by staying on the same time zone all year, and the EU may stop the practice of changing clocks too). In the meantime, for a few weeks a year, those of us who deal cross-border may need to think a bit more about what the time is in our neighbour’s locale.
One further innovation since the last time this topic was aired, is that Outlook now lets you show a third time zone in calendar if you so desire. |


Tip o’ the Week 453 – Outlook Quick Steps
|
Put simply, Quick Steps make some repetitive tasks easy with a single click or even a shortcut key combo – start by selecting a message you’d like to apply some action to (such as moving or categorizing it), or if you’d like to start some new item based on the contents of the message – like create a task or an appointment, including the body of the original mail.
If you haven’t played much with Quick Steps before, have a go – they’re fab-u-lous! |


Tip o’ the Week 451 – OneNote auto-listing
 Here’s a quick tip in OneNote – both the full-fat desktop client and the modern app version – which was inspired either through PEBKAC type unexpected clickery or maybe an Office update that inadvertently switched something off. A common feature stopped working, and it caused a serious dent in productivity… Despite the two parallel PC versions of OneNote – which have been covered previously in ToWs #441, #427, #386, #320, et al – offering a good chunk of similar functionality to each other, there are still quite a few areas where the old desktop x86 version wins through. Add-in support is available in the 2016 variant, for example, so you can run OneTastic (and in particular, OneCalendar, which is immensely helpful if you use many notebooks and take a lot of notes throughout your week).
Search in the desktop OneNote is more powerful, too – CTRL-F takes you to the search box, CTRL-E expands your search, but the most powerful and probably least used is to press ALT-O when you have search results from the CTRL-E dialog; it will order them by the date of the page update… helping to filter out current vs obsolete info.
Bullet lists & indentations (sounds like a Muse song) Did you know that, in both OneNote versions, if you’re typing notes and press the asterisk or dash key at the start of a new line, and then the space bar, it automatically turns your text into a bulleted list? Asterisks in the middle of a text block are ignored; it’s only seen as an auto-correct function if on a new line. Just hit enter after you’ve started typing to add another new bullet or hit enter at the beginning of new bullet to finish the list. TAB and SHIFT-TAB lets you indent and un-indent a bulleted line. It doesn’t sound all that revolutionary, but if you’re typing notes during a phone call, it can make all the difference between keeping up or missing discussion points as you fish around with the mouse looking to click the toolbar. If you’re used to it and it gets switched off, it’s a real pain. The same kind of functionality exists in Word and Outlook too, but now and again it does get in the way – if you’re marking a block of text* that you then want to expand on later without auto-bulleting, for example. * The simplest way to get an asterisk or dash at the start of a new line is to quickly press Undo – CTRL-Z – as soon as the indentation with the bullet happens, and you’ll be reverted to simply having the character at the start of the line. To enable or disable the automatic list features on desktop OneNote, go into Options and look under Advanced…
There doesn’t appear to be any way of disabling the feature on the Modern App (which you can start by running onenote-cmd: at the Win+R box, if you read ToW #445 and #443) – maybe that’s a good thing, preventing the user from harming their own productivity… |
 A simpler and more useful feature for many is the ability to grab the contents and context of a meeting request from your Outlook calendar – so you can take notes during a phone call or a meeting, with all the text in the invite, names and email addresses of attendees etc. Can’t do that with


Tip o’ the Week 450 – blur: team life?
|
Back in the OCS days, it was assumed you had a server on-premises (style note – the opposite of “in the cloud” is “on-premises”, ie in or on the premises you have, possibly abbreviated to “on-prem”. It is definitely not, ever, “on-premise”. If you are on-premise, that means you’re in agreement with a point of view, not that you still run your own datacent(re|er)…), not an assumption that you’d make today, with flexible working and Wi-Fi everywhere.
Anyway, as well as having on-prem kit that’s quite possibly connected to a physical phone system, Lync/S4B largely assumed your client (wired to a LAN) connected to a local server. That communicated to other clients and servers in the same environment (mostly) and, maybe via a gateway, to the outside world for the POTS. How cool it was to click a link in the communicator client, and next thing your desk phone was calling that number! As Teams imminently starts to replace Skype for Office 365 customers, we’re seeing lots of best practice guides and other resources for successful adoption. Further Teams ToWs will follow as well – in fact, if you have one you’d like to share, please write it up and send it over. This week’s tip focuses – or rather doesn’t – on a very cool trick when using Teams for video calling: the ability to blur your background, so as to remove distractions for other parties in the call. There’s a great short video ad illustrating the feature, here. See it in action here.
Blur background was made generally available to coincide with Ignite – as were a bunch of other updates. |


Tip o’ the Week 449 – Snipping Tool gets the snip
 As mentioned in ToW #447, there are some tweaks coming in the Windows 10 October 2018 update, which might be with us sooner than you think.The old Snipping Tool (not to be confused with the similar screen snipping utility that’s installed if you have OneNote 2016, activated by pressing WindowsKey+S) is going away, and giving way to a new program. And some people aren’t happy about it (in fact, if this was a story which features on the sponsored clickbait tiles on the Edge browser homepage, it’d be described as Microsoft Has a New Trick, and These People are Furious About It…).
If grabbing a free-form selection, once you’ve more-or-less completely made a shape and when you release the mouse button Despite the fact it’s a Modern App and People With Too Much Time On Their Hand Think This… is a bad thing, it’s actually pretty snappy and provides a useful polish to one of the more esoteric but handy features in Windows.
Of course, another method (useful in the preparation of this very note) is to rely on the old PrntScn button, the pressing of which dumps the contents of the screen – floating toolbars and everything – straight into the clipboard. Paste the contents into MSPAINT, then use the Snipping method above to grab the relevant section of your screen grab, and you’re sorted. |
 The new
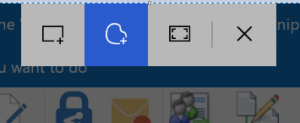 olbar at the top of a greyed-out screen, making it quick and easy to either grab a rectangular portion of the screen, a free-form selection, or the whole screen itself.
 you’ve been holding down, then a large “toast” appears in the bottom right of the screen advising that it’s now in the clipboard. If you click on that,
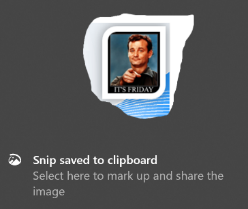 you’ll be launched into the Snip & Sketch app, where you can do various tweaks to your grab, save it, share it and so on. An alternative to the Win+S method of invocation is to go into Snip & Sketch to start with, and initiate a new screen grab from there.
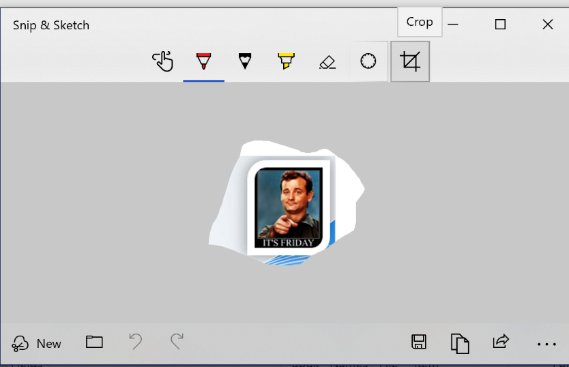 Handy especially if you prepare any kind of training documentation, or you’re stupid enough to send out a weekly tips email to thousands of people for 9 years.
Tip o’ the Week 448 – Sometimes, size does matter
|
Nowadays, with 50 or 100GB mailbox quotas being the norm, most Outlook users don’t need to worry about reducing the size of their mailbox other than to keep it from being too hard to use – a tidy mind and all that. But if you have massive mailboxes, the storage and organisation of all your content may put an unnecessary strain on your PC, so it’s worth taking a few steps to check and clean up if you can.
In Outlook 2016, go to the File menu and l … and marvel at a dialog box that hasn’t changed since the earliest days of Outlook, evidenced by the fact it measures size in KB rather than MB or even GB… Limits to be aware of There are some recommended limits that have been given to Exchange/Outlook users over the years – not just about the overall size of the mailbox, but the number of items in certain folders and even the number of folders themselves. See a 2005 post on the Exchange blog here, for example, which advises keeping the item count low on certain folders (< 1,000 items in the Inbox, Calendar and Contacts folder was the recommendation then – also on the Exchange Blog, check out some of the examples in this post for early pioneers of huge mailboxes). In more recent versions of Outlook, though, there are some guidelines to avoid performance problems:
Now, you’re probably not going to have too many folders with more than 100k items though it might be worth checking Sent Items and Deleted Items. Unfortunately, the mailbox size tool above shows you the total size of each folder, rather than the number of items – and if you want to know how many folder you have, you’d need to manually count them in the scrolling list box: not an easy task if you have lots of them. It’s quite possible if you’ve had your mailbox for a while, and you’re a very diligent filer (especially if you use a methodology like GTD or tools like ClearContext), you could inadvertently have more than 500 folders – and if you use AutoArchive, then you could find a lot of them are empty, since the archive process moves the items out into another location but leaves the folder structure behind.
FolderCount to the rescue Here’s an interesting little hobby project – a macro-enabled Excel sheet which cycles through all the folders in your mailbox, tells you how many items are in each one and offers to get rid of the empty ones for you. It can be run in:
Use with caution; though anything that is successfully “deleted” will be moved to Deleted Items first, therefore you’ll need to run it again to actually do the damage (or just empty your Deleted Items… a thought that fills some people with dread). To run it, click on the link above, save the file locally, open it up in Excel and you’ll need to Once you’ve done that, click on the appropriate button to let it run. I’d suggest starting with the top one until you feel brave… *The Thread Compressor tool was made available externally after a time, but the domain disappeared… the actual Outlook Addin is again available here, but you’re a bit on your own as far as installing and using it is concerned… |


