0x29A – It’s only a number

Last week’s ToW was the six-hundimagered, three-score and fifth, and while this week’s is one more, it’s probably best if it’s not mentioned. As well as being called out in a certain old book, said number also features greatly in legend, light musical entertainment and popular fiction.

Other numbers attract a certain amount of superstition – some tall buildings don’t have a thirteenth floor, for example, and even big companies like Microsoft have been known to clip_image002dodge bad luck by not shipping a v13 of a product (like Office – look at the File | Account | About dialog in any Office app, and you’ll see the version number – Office 2007 was v12 and Office 2010 was v14). Some cultures don’t much like the number 4 or 14 either.

clip_image004One numerically interesting but easily overlooked app in Windows 11 is the venerable Calculator. Start it by pressing the Windows key and entering calc, or if you’re truly blessed, you might even have a physical button on your keyboard. The app starts in whichever mode it was last run – by default, a simple calculator with the same kinds of functions that were common on the popular pocket calculators of the 1980s.

But look at the hamburger menu on the top left and you’ll see so much more – from Programmer functions to convert numbers from clip_image006one clip_image008base to another (so you can decode hex error messages or “funny” binary t-shirts*), to a whole array of converter functions which let you quickly change currency (at the current rate) or transform from one measurement standard to another.

There’s a neat date calculator too, so you don’t need to resort to using an Excel formula to count how many days there are between two dates.

Back in Standard mode, you’ll see the history of your calculations on the right side, and you can use the Memory functions to store multiple numbers for future use; much better than the old one-and-done M- clip_image010M+ and MR buttons on a pocket calc. There’s also a mode which keeps the calculator window on top of others, even if it isn’t the active window at the time.

If you have a full-sized keyboard, you’ll also probably have a NumLock key – that turns the numerical keypad on the right side on and off. In the early days of the PC, smaller keyboards didn’t have separate cursor keys, so these were sited on the keypad. In order to use these cursor functions – and the others, often doubled-up PgUp / PgDn etc – you’d switch NumLock off. And then swear when you went to use the numerical pad to quickly enter a number into some DOS application, only to find you’ve moved the blinking cursor around instead.

*convert each of the 8-bit binary numbers in the t-shirt to decimal; assuming the decimal number is the ASCII code corresponding to a letter, open a new blank doc in Word, and holding down the ALT key, enter the decimal number on your numeric keypad. Oh, if you’ve only got a laptop with no separate Numlock/keypad, bad luck.

665 – Mind your screenshots

imageScreen-grabbing has been around in some forms since the earliest days of the IBM PC – there is a PrtScn key on most keyboards, for example. Back in the day it would have sent the contents of the screen to a physical printer but later might save the info to a file or copy it to the clipboard.

Windows has had a screen grabbing utility for a while called Snipping Tool, which was replaced with a new tool called Snip & Sketch. The gist of these tools was that pressing some key combo (eg SHIFT+WindowsKey+S) would grab a portion of the screen and copy it into the clipboard. Snip & Sketch ultimately gave way to a new version, called, er, Snipping Tool. There have been many ways to take screen shots over time.

clip_image002clip_image004The latest iteration of the app throws a toolbar at the top of the screen when invoked with SHIFT+WIN+S, and gives a variety of options on how to grab that screenshot. You can also set Windows to use the physical PrtScn key to do the same in case you forget the shortcut combo.

After completing it, you’ll see a pop-up in the lower right to tell you that it has completed.

In previous versions, if you wanted to manipulate or save the screen grab, you’d need to click quickly on that toast to then launch the Snipping Tool UI with the grab inside, or else you’d need to paste the image that is now in the clipboard into another image manipulation tool and modify or save it to a file from there. Annoyingly, there’s never been an option to paste what’s in the clipboard into the Snipping Tool’s UI, so you could edit or save it quickly.

clip_image006An alternative approach would be to start the Snipping Tool first and initiate the screen-grab from within; you could make some simple tweaks and highlights (like cropping it, or circling a part of the screen in red ink) from there. Kicking off the snipping from within the tool gives you other options too – like grabbing in a few seconds, to give you time to ready the app you’re trying to capture.

clip_image008A new feature to the Snipping Tool is the default setting that it saves snips to a “Screenshots” folder; it’s configured in the Tool itself, should you want to disable it.

The Screenshots folder itself is within your “Pictures” folder, unless you’ve decided to move it somewhere else (if you’re that way inclined, open the Pictures folder, right-click on Screenshots and under the Location tab, click Move to find a new home for it).

clip_image010It’s worth keeping an occasional eye on the size of the Screenshots folder, as it could well have hundreds of grabs totalling many megabytes of data. Screen grab files are named with the date and time in the filename,  so you can easily get to the latest one by opening the folder and pressing the Home or End key (depending on how you have it sorted). Feel free to delete any you don’t need.

clip_image012The … menu in the top right of the Snipping Tool lets you quickly find your way to the Screenshots folder directly, or if you press WindowsKey+R and enter shell:screenshots, it’ll open in a new Explorer window.

If you favour command lines in general, you can also start the Snipping Tool by pressing Win+R and entering ms-screensketch: (including the comma) to run the full UI or ms-screenclip: to jump straight to the capture just as if you’d pressed SHIFT+Win+S.

664 – Android apps on Windows

clip_image002Microsoft has a somewhat complicated history with ”mobile apps”. The Windows Phone platform promised much, and though many of the ideas were good, ultimately it went away. The Universal Windows Platform app model was a sound idea in some respects, but when the ‘Phone disappeared, its raison d’être ceased to be.

At one point, there were calls that Windows Phone should be able to run Android apps in emulation, or that Microsoft should embrace Android in other ways. Recent years have seen Microsoft publish a profusion of Android apps, including the excellent Launcher, which takes some of the ideas honed in the Windows Phone UI and makes them available to just about any Android phone.

When the dual-screen Surface Duo phone appeared, it was the first time Microsoft had shipped a device running Android as the base operating system. Recent speculation on the future of the Surface Duo 3 might point to a different form factor, but it’s still very likely going to be running the Android OS.

On the desktop, Windows 11 has been offering Android apps to many users for a little while. Similar in some ways to Windows Subsystem for Linux, which basically lets you run a fully-fledged Linux machine inside your Windows PC, the Windows Subsystem for Android means running Android in a virtual machine and allowing apps to appear in a window alongside native Windows apps.

clip_image004To run Android apps on the WSA on Windows 11, you first need to install the Amazon Appstore. There are many apps in this store, but since it originally started as a walled garden for Amazon’s own Fire tablets, there are gaps. You won’t find many banking apps, for example, and aside from the thousands of garish games, many of the available apps could just be run in a browser on your PC instead.

clip_image006Install the Amazon Appstore app from the app for the Microsoft Store (still with us?), and it adds the bones of the Subsystem for Android too.

The Amazon Appstore app itself is a bit crude – it doesn’t offer much opportunity to filter and sort the apps it presents, so it’s not easy to wade through the many stupid games to find real apps you might want to use. It’s maybe better to peruse what’s available through a browser, and then search specifically within the Appstore app for the app you want to add.

clip_image008clip_image010After you’ve installed your Android apps, you will see them show up individually in Windows’ list of programs, with nothing obvious to differentiate from native apps.

clip_image012Clicking the menu next to an installed Android app then choosing Modify presents a familiar-looking UI (if you have an Android phone) for managing the permissions or the running state of the app.

If you wanted to use Android apps that are not published through the curated Amazon store, you’d need to have access to the Google Play store, and that’s not officially an option with the Windows Subsystem for Android.

There are numerous hacks online to enable Google Play Services (and thus the Googley Store) but getting it installed and running is convoluted, and at least one script has already been subverted with malware, so might be a risky endeavour too. You might want to try running BlueStacks or another Android emulator, to get access to the Google Play store.

659 – Sounding out apps

clip_image002

How you control the sonic emissions from your PC has changed repeatedly over the years; volume is often adjustable by hardware buttons or function keys but more advanced controls are usually found by double-clicking a speaker icon in the system tray. Windows 11 evolved the UI further, in the hope of making it easier to use.

Now, if you click the speaker, you don’t jump to the full blown sound control panel, but to a quick settings dialog which clip_image004controls some commonly used connectivity and display settings, customizable if you like. Desktop PCs typically don’t need Flight mode, but nocturnal users may want to add night light for quickly changing screen colour.

clip_image006Drag the slider by the volume icon and the predictable happens but click the icon to its right and you can easily choose which output device you want to use, if you have several (like headphones, speakers, monitors etc). Clicking More volume settings at the bottom takes you to a more fully-featured volume control panel.

If you have multiple monitors connected to your PC – especially if HDMI is involved – it’s clip_image008possible your machine might expect to route sound to one or more of them; unless you do actually have speakers attached to the monitor, or it’s in fact a flippin’ big television, you’d probably prefer it didn’t show up on the list of potential output devices.

clip_image010Click on the arrow to the right of the device you want to exclude – the ASUS monitor, in this case – and then hit the Don’t allow button: next time you look in the quick volume settings UI, it’s no longer there.

Some apps might have a UX for controlling audio output directly, over-riding the system default and probably sticking with whatever device you choose – Teams or Zoom, for example, may choose a USB speaker/mic or a headset if connected, rather than using the laptop speaker. If the app doesn’t know anything of sound devices, then ordinarily it will use the default (as per the options above), but there is a somewhat hidden setting that lets you tweak things further rather than having to alter the system’s chosen output just for that app or session.

If you want to fire the audio stream from a particular app at a different endpoint than the system default – let’s say you have a Bluetooth speaker connected, but you’d prefer system sounds and the likes to keep coming from your laptop speakers – you could tell Windows to send that app’s audio output to a different place, and the app will never know about it.

clip_image012In the main System > Sound control panel, scroll down to Volume Mixer and click the arrow to open it up. In that page, you’ll see a list comprising the currently-running applications which have made some kind of audio output (in other words, if you want to set an app up, make sure it’s started it and if it’s not in the list, start playing something).

clip_image014

In this case, the Dell monitor does have an amp & speakers attached to its audio line-out socket (where audio is sent to the monitor via the display cable, and it then puts it out to the speakers), so while spending a day of Teams calls and other system sounds emanating from the tinkly-bonk USB speaker, the business of smashing out some banging tunes can go to the bassier speakers.

clip_image016Finally, should you wish to give your devices more meaningful names than the ones shown, look for More sound settings in that first System > Sound settings page. This brings up a Windows clip_image018XP-era dialog which allows more precise configuration of devices and levels.

The Sound dialog lets you choose the sound scheme (controlling all the bongs and bings of Windows), configure the speaker arrangement (if you have surround sound etc), or choose all kinds of enhancements and effects.

It also lets you rename the device altogether and set a different icon, so when it shows up elsewhere – including in the shiny Windows 11 Settings app – then it’ll be a bit clearer what it really is

651 – Snappy Snap

imageSnap is a feature in Windows, used to arrange applications on screen, building on a shortcut that has been around since Windows 7: press the Windows Key and one of the arrow keys simultaneously, and the current window will be maximised, minimised or snapped to one side of the screen. Windows 8’s touch fixation brought other means to control window layouts, while Windows 10 evolved things further with “Snap Assist”.

One of the improvements that came initially to Windows 11 and has been improved in the latest 22H2 updateimaginatively called the Windows 11 2022 Update – is the Snap Layouts feature, allowing finer control on the way you want windows to be arranged.

clip_image002Especially useful on high-res displays, this can be invoked by hovering the mouse over the maximise icon in the top right of any window, and choosing from a set of offered layouts.

clip_image004You’ll then be able to select other open applications that can be slotted into the remaining screen space.


clip_image006This Snap Layout can also be invoked on the active window by pressing WindowsKey+Z, followed by a number key to represent the layout you want; press the corresponding number and then another clip_image008number within the destination group, to quickly move the window – or Edge browser tab – to that location. This now creates a Snap group which shows up in the ALT+TAB gallery as if it was a single application, so making it easier to manage side-by-side windows that are related.

clip_image010Finally, in the Windows 11 22H2 update, if you drag your window to the top of the screen, a small black bar will hove into view…

clip_image012Continue dragging your window onto that as a target and a larger control will appear, allowing you to drop your window into the appropriate place. This also kicks off the Snap Assist feature which lets you easily select the other windows you’d like to be in the same layout.

*Deceased muso George Michael famously pranged into a Snappy Snaps store, leading to some inspired graffiti.

649 – Exploring SharePoint libraries

clip_image002SharePoint is now old enough that it could walk into a bar and buy itself a beer. It has changed a lot over the versions; starting out as a server product that would produce “portals” (or “digital dashboards”) it grew quickly to being rather more document-centric. SharePoint became the back-end for OneDrive for Business storage, and both have evolved a long way.

Two years ago, SharePoint was said to be used by over 200 million users. The following year, the Gartner MQ had it way out in front on the “Ability to Execute” Y-axis and slightly behind only one other supplier on the “Completeness of Vision” X-axis. It won’t be long now for the next MQ report to appear.

Nowadays, SharePoint underpins quite a lot of Microsoft 365 functionality, such as apps like Lists which provide a groovier UI over the top of the base web services, and the document oriented collab in Teams.

clip_image004If you look at a file library in Teams, you’ll see a bunch of SharePoint-y options – you can Sync the content offline and it will be held offline, using OneDrive to sync it (and if you like, syncing only the files you’ve opened rather than the whole shebang).

clip_image006The Sync’ed libraries show up in the Windows Explorer app, and in any number of applications’ File | Open / Save dialog boxes, so you can access and interact with the files through the apps you use rather than browsing to SharePoint.

You’ll see a collection of folders that have been set up to Sync, shown with your organization name, alongside any personal OneDrive and OneDrive for Business synced libraries.

The Download option (next to Sync on the Toolbar in Teams), creates a single ZIP file your computer, with the entire contents of the folder you’re looking at, so use it carefully.

clip_image008One somewhat overlooked option further to the right of the toolbar (or may be on the ellipsis (“…”) menu): Add shortcut to OneDrive. This creates a shortcut link to the current SharePoint folder within your main OneDrive for Business storage, making it easy to find that SharePoint folder in the future, even though it’s not synced offline. The Add shortcut option is also visible on the ellipsis to the right of sub-folders when viewed in SharePoint or Teams.

Don’t add shortcuts to libraries – or sub-folders – which are already being Synced offline. That would be bad.

One downside to the OneDrive shortcut approach is that it just dumps the link into “My Files”, which is the root folder in OneDrive. The shortcut is named the same as the original source – so if you have lots of Teams folders with the same name (eg “Documents”), they will clash with each other as adding a new link would try to create a shortcut with the same name as one that exists already.

clip_image010

One solution would be to create a subfolder in OneDrive, called Sites (or similar), and after creating the shortcut to your latest Teams/SharePoint site, go to the root OneDrive folder and move your new shortcut – maybe renaming it too, so you can see what its parent site was (since the shortcut doesn’t make it clear what the source SharePoint site is) – you’d then have a Sites folder with lots of Shortcuts like Project Team – Documents etc.

Another side benefit of using shortcuts rather than Syncing offline, is that if you have multiple PCs – or feel like accessing OneDrive through a browser on a different machine altogether – you will always have access to the same collection of shortcuts, whereas the Sync offline capability is configured separately on each machine.

647 – Power of the Toys

imageAfter Windows 95 appeared on 25 August 1995, one of the later updates was to release a bunch of tweaks and addons which had been built to enhance the OS, but not considered mainstream enough to include them in the box – the Windows 95 PowerToys. They included such amazing advances as a round clock, or tools to help manage the country of your modem. Some more history of the PowerToys was covered back in 2005 by veteran commentator Raymond Chen.

In 2019, the Power Toys name was dusted down for a new run at building addins to Windows, this time using an open source approach; the vision document lays out what the team wants to achieve, and they are steadily releasing new versions with fixes, improvements and new features. You can find Power Toys in the Microsoft Store, or if you like to do to prove your geek creds, you can go straight to GitHub and clip_image002download it.

Recently, v0.62 came out and added some new functions, like a draggable box (Screen Ruler) which shows you the exact number of pixels between the start point and the mouse – useful if you’re looking to figure out how large a part of your screen is.

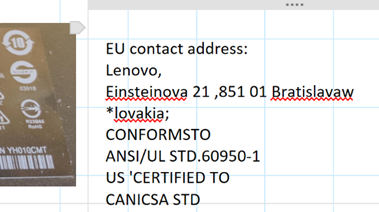
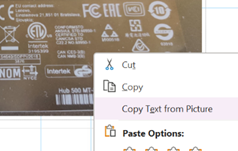
There’s clip_image004a neat Text Extractor tool which can take a selected area of an image and read the text within it straight to the clipboard – handy if you needed to get the serial number from a piece of electronics; take a picture on your mobile of the tiny writing on the back of the device, and quickly extract the details for pasting into some other app or website.

Other PowerToys of note include the Mouse Utilities, which can help find the mouse on screen – a double-tap of the CTRL key and you’ll get a temporary spotlight on the mouse, which can be super useful if you have multiple monitors and are not quite sure where the pointer has gone.

643 – Wireless extensions

clip_image002[6]

A computer on every desk and in every home”; that original Microsoft motto, all the way back from a time when any sane person would have said it was nuts. Looking back now, though – hands up, who has only the one computer at home?

clip_image004[4]The WindowsKey+P shortcut key has been used since Windows 7, for sending your screen output to another device. At one point, this was maybe a meeting room’s projector – hence “+P”. You’d plug it into the VGA port on your laptop, press Win+P and you’re away. These days, does anyone “project”? Or just mirror or extend their desktop to another connected display or monitor?

You’ll commonly be able to wirelessly “project” to a large screen on the wall in a meeting room nowadays, rather than having to faff about with ceiling-mounted projectors, with all their bulb issues, noisy fans and the multitude of connectors required.

clip_image006[4]Windows 10 and 11 has a nice wireless projection UI, used to “Cast” to a wirelessly-available device, such as a TV which uses the somewhat messy Miracast standard. Either through native support, or by adding a media stick like Roku, Chromecast or FireTV, most TVs can be made to receive the display output of your laptop.

One somewhat underappreciated feature, though, is the ability to set your PC to be the recipient of wireless projection from another machine. This could be used to show something to a nearby colleague, displaying your desktop on their PC, or to share your PC screen to a room where someone else is currently plugged into the screen / projector, and you can project to their machine rather than unplugging them.

Lesser known is the ability to wirelessly extend your desktop to another PC, effectively using it as a 2nd monitor.

clip_image008[4]To kick off proceedings, press Start and type project to find the shortcut to Projection Settings.

If you haven’t set it up previously, you’ll need to add the Wireless Display optional feature; have a look through the others in the same dialog to see if there’s anything else that takes your fancy.

After adding Wireless Display, clip_image010[4]you’ll be able to set various options about how and when to receive connections. Start the “Connect” app on the destination PC and you can run a source desktop in a window or make it full-screen.

clip_image012[4]This projection feature can be used to extend the desktop of your main machine onto a second PC.

If you have a spare laptop or a home desktop PC which has Wi-Fi capability, you could set it up to be the recipient of projection from your main work machine, as long as they’re both on the same wireless network, and without the need to join in domains or have the icy grip of corporate control extended to your own hardware.

Select the option to extend your desktop to the remote machine and you can use it just like an additional monitor.

clip_image014[4]

As many of us are used to having multiple screens in our home office, it could be worth carrying a second laptop if you go into an actual office where decent 2nd screens might not be available.

Having better kit at home than in the office is just one thing to deal with when going back to a workplace


641 – What’s the Time, Mr Wolf?

clip_image002

Time-telling technology has always been a hot-bed of invention, from the radically precise first marine chronometer in the early 18th century, allowing more accurate navigation on long sea voyages, to atomic clocks that can measure time with the accuracy of one millionth of a second over 10 years.

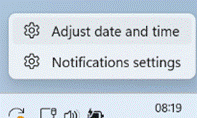
clip_image004Computers and smart phones probably never need your intervention to set the time, except when travelling abroad and you want to manually manage the time zone – if you prefer not to let the machine do that for you. To play with the time settings in Windows, just right-click on the clock in the system tray and choose to adjust from there.

clip_image006If you’d like to know what the actual time is, maybe after a power cut has blanked the clock on your cooker or you need to adjust because of Daylight Savings Time, how do you know what the real time is? Call the Speaking Clock? Switch on TV news and wait for the clock in the corner to click over one more minute?

Even better than that, check out time.is, a service synchronized with an atomic clock and which purports to figure out how accurate your computer’s clock is compared with the real time. Open the time.is site on your mobile phone and you’re ready for next time you have to set the clock on your video recorder or bedside alarm.

The chronometer (“time” and “measure”) evolved from a ship’s device for navigation and became a byword for a really accurate watch (they even had competitions until the late 1960s for the manufacturer who could make the most accurate timepiece – right up until the Japanese started beating the organising Swiss at their own game, so they took their ball away and went home). Meanwhile chronographs (“time” and “write”) were devices made to accurately measure time gone by, such as at the request of France’s King Louis XVIII, who wanted to know exactly how long his horse races lasted. Early devices actually marked the passage of time on the dial with a pen.

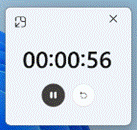
clip_image008In Windows, you can easily time events or have countdown timers that alert you when your eggs are boiled or it’s time to start working again – look in the Swiss Army Knife that is the Clock app. You can display multiple timers in one window if necessary, make a single timer go full screen (useful if you’re presenting and counting down to getting started) or pop out to a side window.

If you wear an old-fashioned watch, you may have a simple way to measure elapsed time –  some will have built-in timers, and others will have a moveable bezel which lets you rotate the zero-marker to where the minute hand is pointing at the start of something you want to time.

clip_image010clip_image012If you look at the watch a few minutes from now, you’ll see how many markers on the bezel the minute hand has moved on by – not exactly sub-second accurate but it’s good enough for the “about 10 minutes” type measurement.

You could also reverse the process and set the bezel’s 50 minute marker at the minute hand, so counting down 10 minutes towards the zero marker instead. You do need to keep an eye on it as there’s no alarm.

clip_image014Contemporary chronographs are analogue watches with built-in stopwatch functions, usually controlled by start and stop buttons on the side. They may count to fractions of a second marked around the edge, and some sport Tachymetre marking around the outside – designed to let you calculate how fast something is travelling as it goes over a set distance, or how far you’ve travelled if you know your constant speed.

It’s hardly red-hot technology, but millions of watches have this fantastically complicated but nowadays basically useless feature. They have to sell wrist furniture somehow.

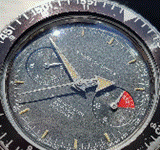
Perhaps the most over-sold and fantastically-named wrist watch from the 1960s was the now re-issued Croton Nivada Grenchen Chronomaster Aviator Sea Diver – a single device that could be used for so many things as it combined various chronograph and bezel-rotating features in one 38mm-wide watch, billed as a “wrist-sized computer”.

Just make sure you have a magnifying glass handy to be able to read all the tiny markers and numbers on it.

638 – Tracking and Mapping

clip_image001[6]
Looking back over the smartphone era of the last 15 or so years, one of the most transformative technologies is the confluence of mapping and geo-location, providing route guidance, finding things and even people. How did we manage to make our way around cities before maps in the palm of our hands? Just exit a tube or subway station anywhere in the world, and observe the herds of people spinning around looking at their phone trying to get a GPS fix.

Although Microsoft ceded the mobile phone space around 5 years ago, effectively leaving Android and iOS as the only options, the Bing Maps service still survives, even if fewer websites and mobile apps make use of it today. clip_image003[4]Windows 11 comes with a built-in Maps app which offers some decent functionality (and offline use), but lacks some of the features of Bing Maps in a browser, like the Ordnance Survey view showing public footpaths and other attractions in the UK (if you have the country setting to United Kingdom, that is).

Given the lack of “Bing Maps mobile” – and the commensurate lack of usage – the data that sits alongside may be less accurate, too; look at the reviews on the Windows Maps app in the store, and the main complaints are from people who don’t want it at all or comments about the map and PoI data being stale.

clip_image005[4]Some neat features in Bing Maps make it stand out from others – the Bird’s Eye view is cool, though not always as fresh or widely available as it used to be.

The team still updates imagery for the web view, provides data to the awesome 3D Cities feature in Windows Maps and contributes to the amazing scenery in Flight Simulator (even if some modders are switching Flight Sim to using Google Maps instead).

Bing Maps in a browser does sometimes offer a City Flyover option, which is akin to the Flight Sim view.

clip_image007[4]clip_image009[4]Bing’s Streetside can be sparse compared to Google’s Street View, even though the Google Maps car is sometimes thwarted with a “None Shall Pass” situation. Search the web and there are many – some NSFW – weird attractions found on Street View.

Some odd things can be found on Streetside too.

Apple used Google Maps data for its own maps app on the iPhone at first, but replaced with its own service which was at first poorly received. 10 years later, Apple Maps – available, of course, only to fruity device users – does a much better job and purports to be less cavalier with the user’s data than the advertising company. Despite a much larger number of users flocking to the universally available Google Maps, Apple Maps provides a good service for iOS users, and is there by default.

clip_image011[4]If you choose to surrender the use of your personal data to the advertising industry, Google Maps does offer some very useful capabilities in recording where you’ve been; it will remind you where you parked your car and let you see if you’ve visited a particular place before, and when.

clip_image013[4]If your family and friends consent, you can also share your whereabouts in real time, showing a pin in the map where they are, and when the location was last recorded.

This could be handy for checking if your kids are where they’re supposed to be, for friends arranging to meet or just knowing when to expect someone to come home. You can enable sharing of your location to each specified contact for a limited time or until it’s turned off, and it will also let you see their name, picture and other info including (!) battery level of their phone.

clip_image015[4]Sign into Google Maps on your computer, and you’ll be able to keep track of people a little more easily, too (as well as manage your own location sharing), and review your own timeline of where you’ve been. It’s usually somewhat fascinating and sometimes a little creepy.

Fortunately, you can choose to edit or remove certain items of data, export it to other formats or disable the collection of it altogether.

You give up some control of personal data, and you get some benefit from it.

As some say, them’s the breaks.